Image generation with nele.ai
The image generation feature allows you to create images directly from a text description. Simply enter a clear prompt, select a suitable model if needed, and then adjust the quality and image format to meet your requirements.The image generation feature allows you to create images directly from a text description. Simply enter a clear prompt, select a suitable model if needed, and then adjust the quality and image format to meet your requirements.
Feature overviewFeature overview
- Open image generationOpen image generation
- Generate ImageGenerate Image
- Enter image description and generate imageEnter image description and generate image
- View and download generated imageView and download generated image
- Open settingsOpen settings
- SettingsSettings
- Select image qualitySelect image quality
- Select image formatSelect image format
- Edit existing images in the chatEdit existing images in the chat
Open image generationOpen image generation
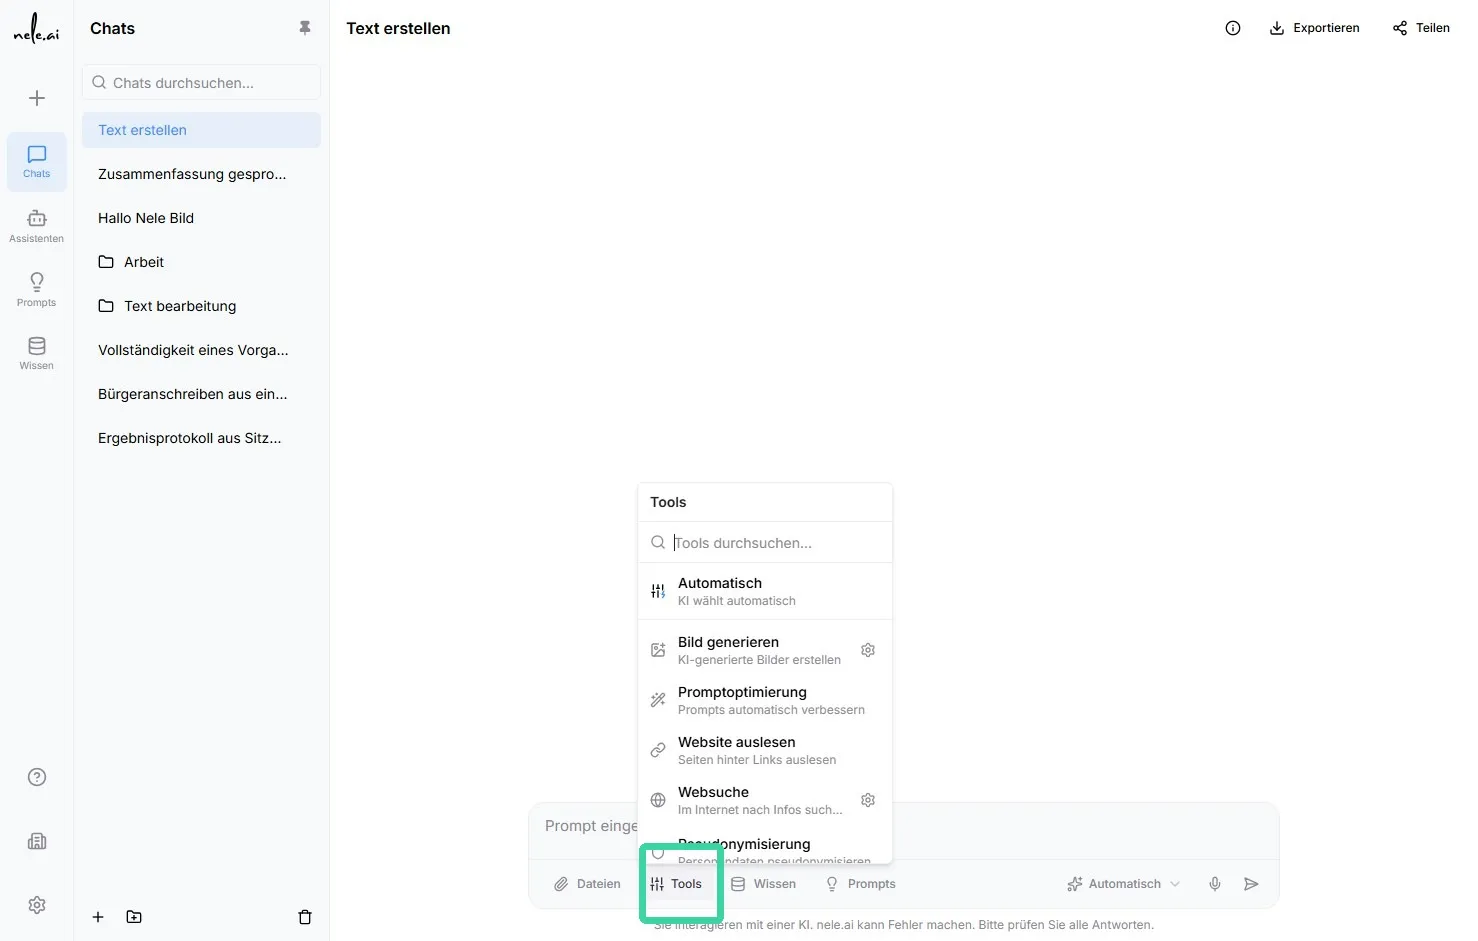
1. Open the ToolsTools section in the navigation.1. Open the section in the navigation.
RequirementsRequirements
To use this feature, you need access to the ToolsTools section. The available models and settings may vary depending on your permissions or the selected configuration.To use this feature, you need access to the section. The available models and settings may vary depending on your permissions or the selected configuration.
Important noteImportant note
The results of an image generation depend significantly on the quality and accuracy of your description. Therefore, be as specific as possible about the subject, style, colors, perspective, and mood you want the image to have.The results of an image generation depend significantly on the quality and accuracy of your description. Therefore, be as specific as possible about the subject, style, colors, perspective, and mood you want the image to have.
Generate ImageGenerate Image
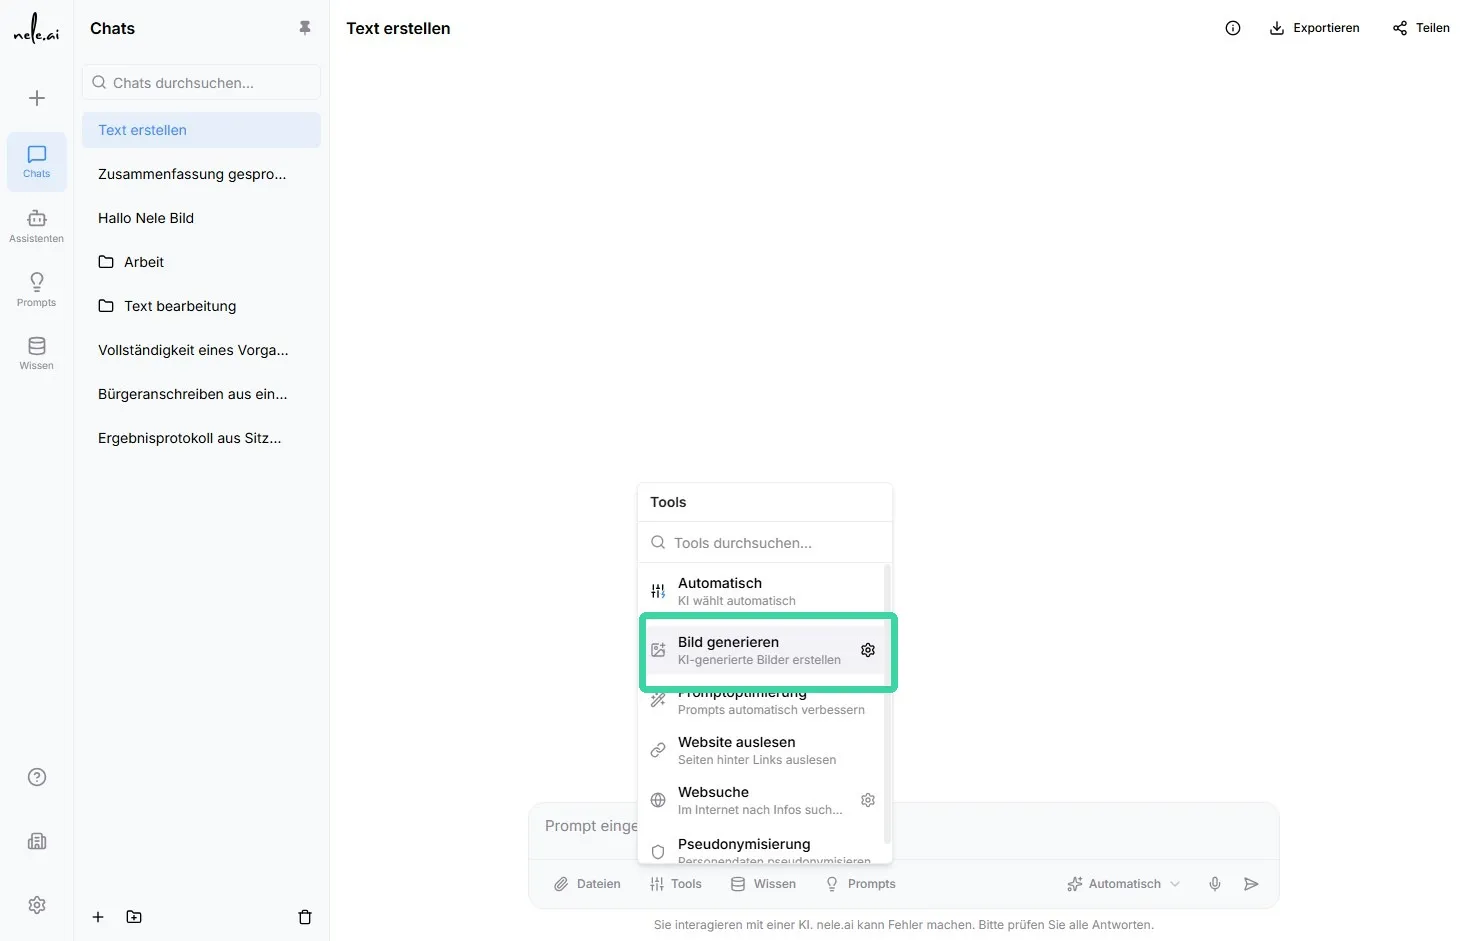
2. Then select Generate imageGenerate image.2. Then select .
By default, the model selection is set to AutomaticAutomatic. In this case, the application will automatically choose a suitable model for your input.By default, the model selection is set to . In this case, the application will automatically choose a suitable model for your input.
Alternatively, you can select an image model manually. This is particularly useful if you want to specifically leverage the features of a certain model or use additional settings.
Tip:Tip: For getting started, we recommend the For getting started, we recommend the AutomaticAutomatic setting. If you want to specifically define image quality or format, select one of the models directly. setting. If you want to specifically define image quality or format, select one of the models directly.Alternatively, you can select an image model manually. This is particularly useful if you want to specifically leverage the features of a certain model or use additional settings.
Enter image description and generate imageEnter image description and generate image
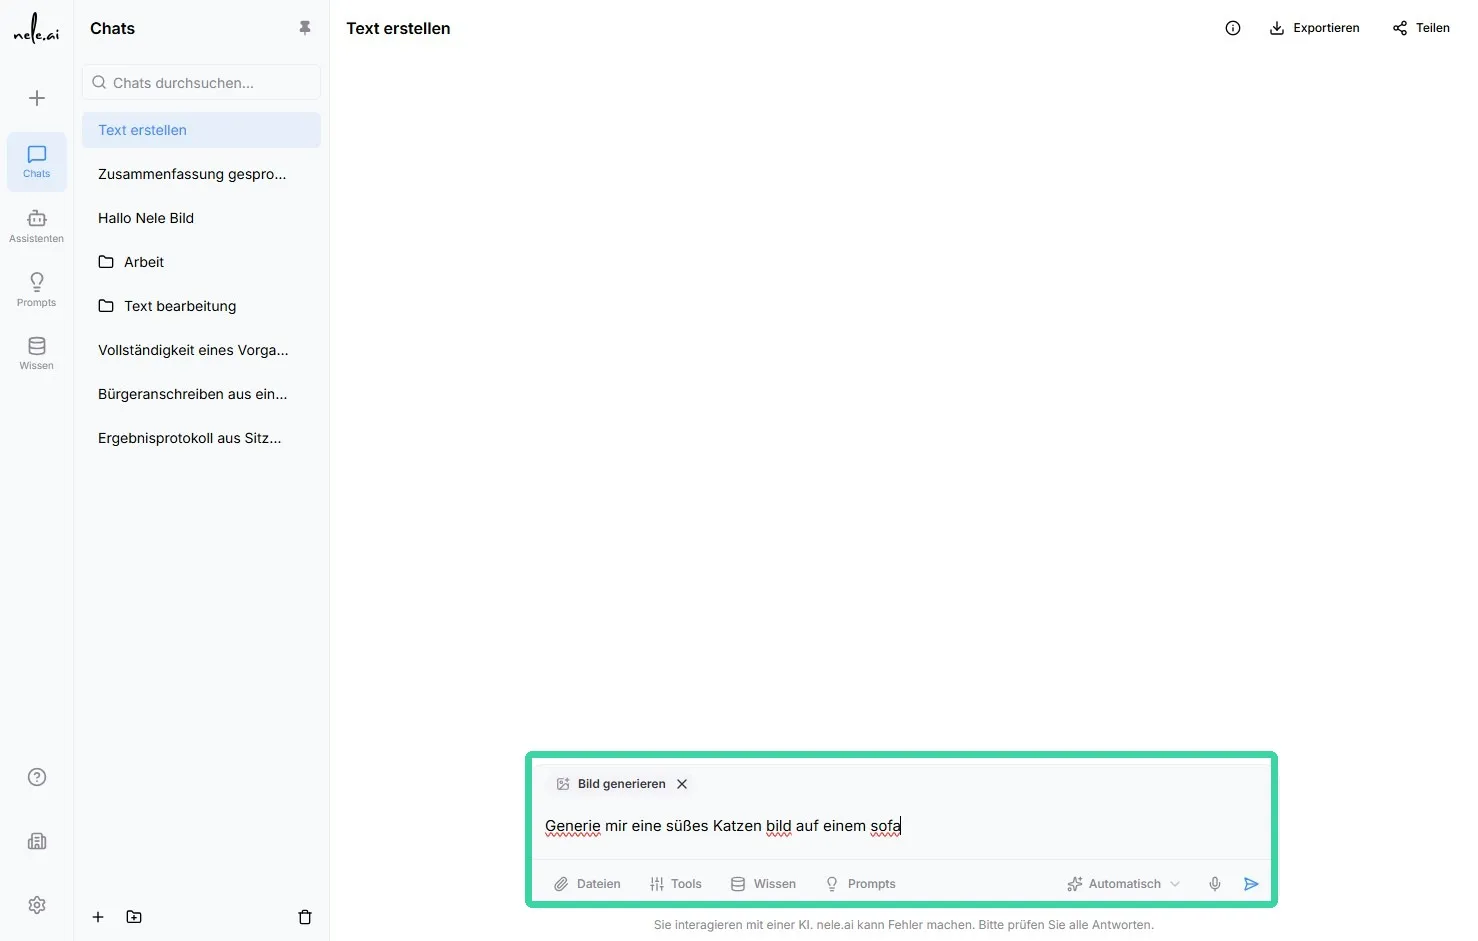
- Enter a description of the desired image into the input field. This description is alsoPromptPromptreferred to as.
- Describe as precisely as possible:
- the main subject,
- the environment or background,
- the desired style,
- lighting, colors, or mood,
- specific details or perspectives.
- Submit your input to start generating the image.
Example promptExample prompt
"Create a cute, photorealistic image of a cat on a cozy sofa. Warm daylight, bright living room decor, soft blanket, and a relaxed atmosphere.""Create a cute, photorealistic image of a cat on a cozy sofa. Warm daylight, bright living room decor, soft blanket, and a relaxed atmosphere."
After submitting, the application processes your description and creates the image. Generation time and costs may vary depending on the selected model, quality, and current system load.After submitting, the application processes your description and creates the image. Generation time and costs may vary depending on the selected model, quality, and current system load.
Tip:Tip: The more specific your description, the better the result will match your vision. Instead of "cat on a sofa," you will usually achieve much more accurate images by including details about style, colors, lighting, and perspective. The more specific your description, the better the result will match your vision. Instead of "cat on a sofa," you will usually achieve much more accurate images by including details about style, colors, lighting, and perspective.
View and download generated imageView and download generated image
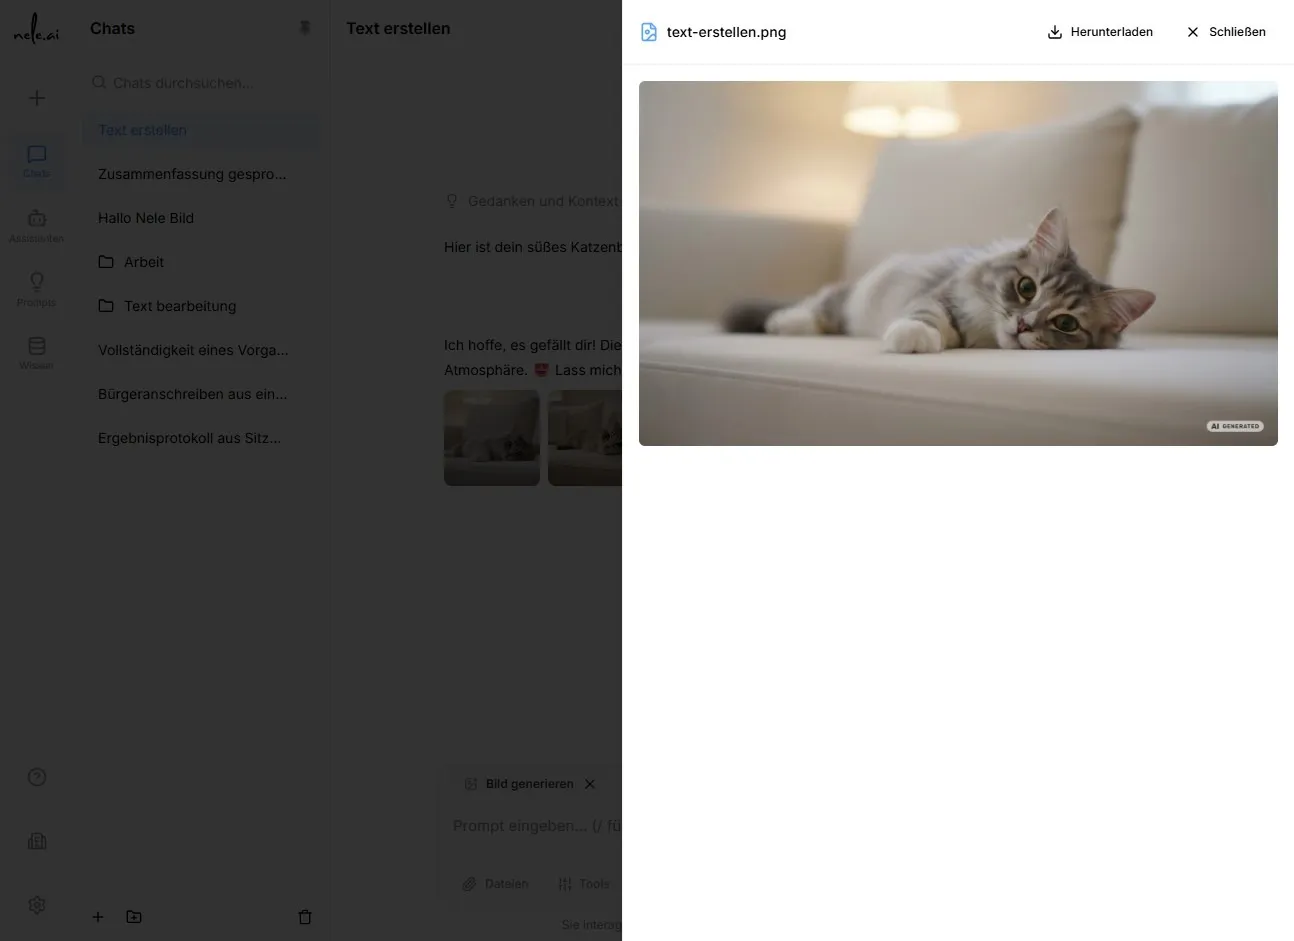
Once generation is complete, the created image will appear in the chat or the results area.Once generation is complete, the created image will appear in the chat or the results area.
- Click on the generated image to view it in a larger format.
- Select the download function in the image view to save the image to your device.
Then, save the file to a suitable location and rename it if necessary to keep it organized, for example by project, topic, or intended use.Then, save the file to a suitable location and rename it if necessary to keep it organized, for example by project, topic, or intended use.
Open settingsOpen settings
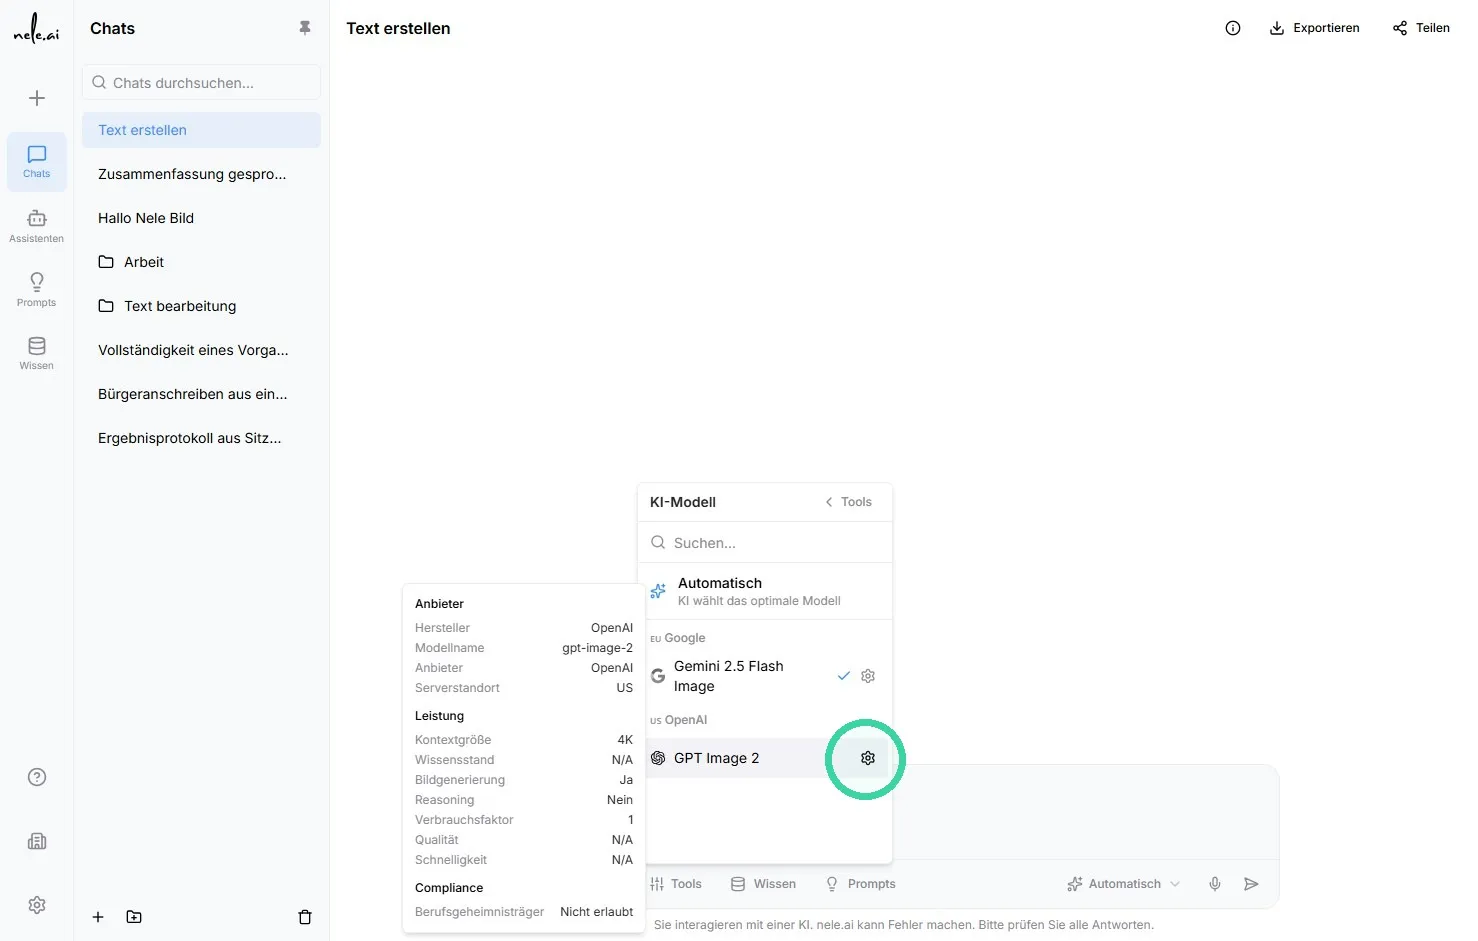
For models such as GPT ImageGPT Image, you can configure additional settings. Depending on the model, these primarily include image qualityimage quality and image formatimage format.For models such as , you can configure additional settings. Depending on the model, these primarily include and .
ProcedureProcedure
- Open the model selection for image generation.
- Click thegear icongear iconnext to the selected model.
- Adjust the quality and format as needed.
- Close the settings and start the image generation with your chosen options.
Important noteImportant note
Not every image model offers the same settings. If no quality selection is displayed, this option may not be available for the model currently in use.Not every image model offers the same settings. If no quality selection is displayed, this option may not be available for the model currently in use.
Settings
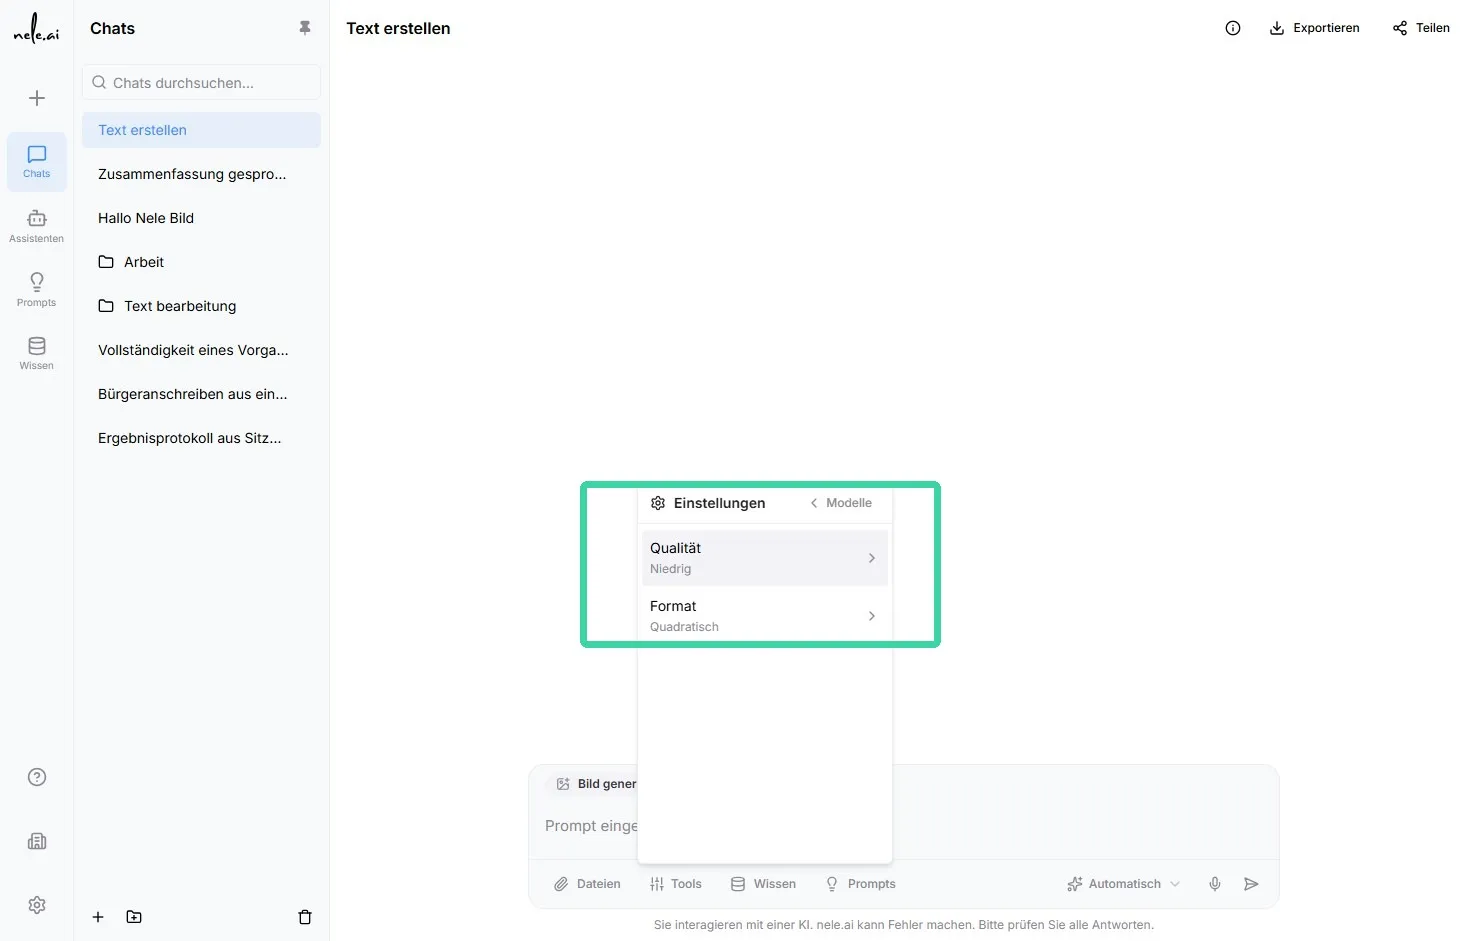
Select image quality
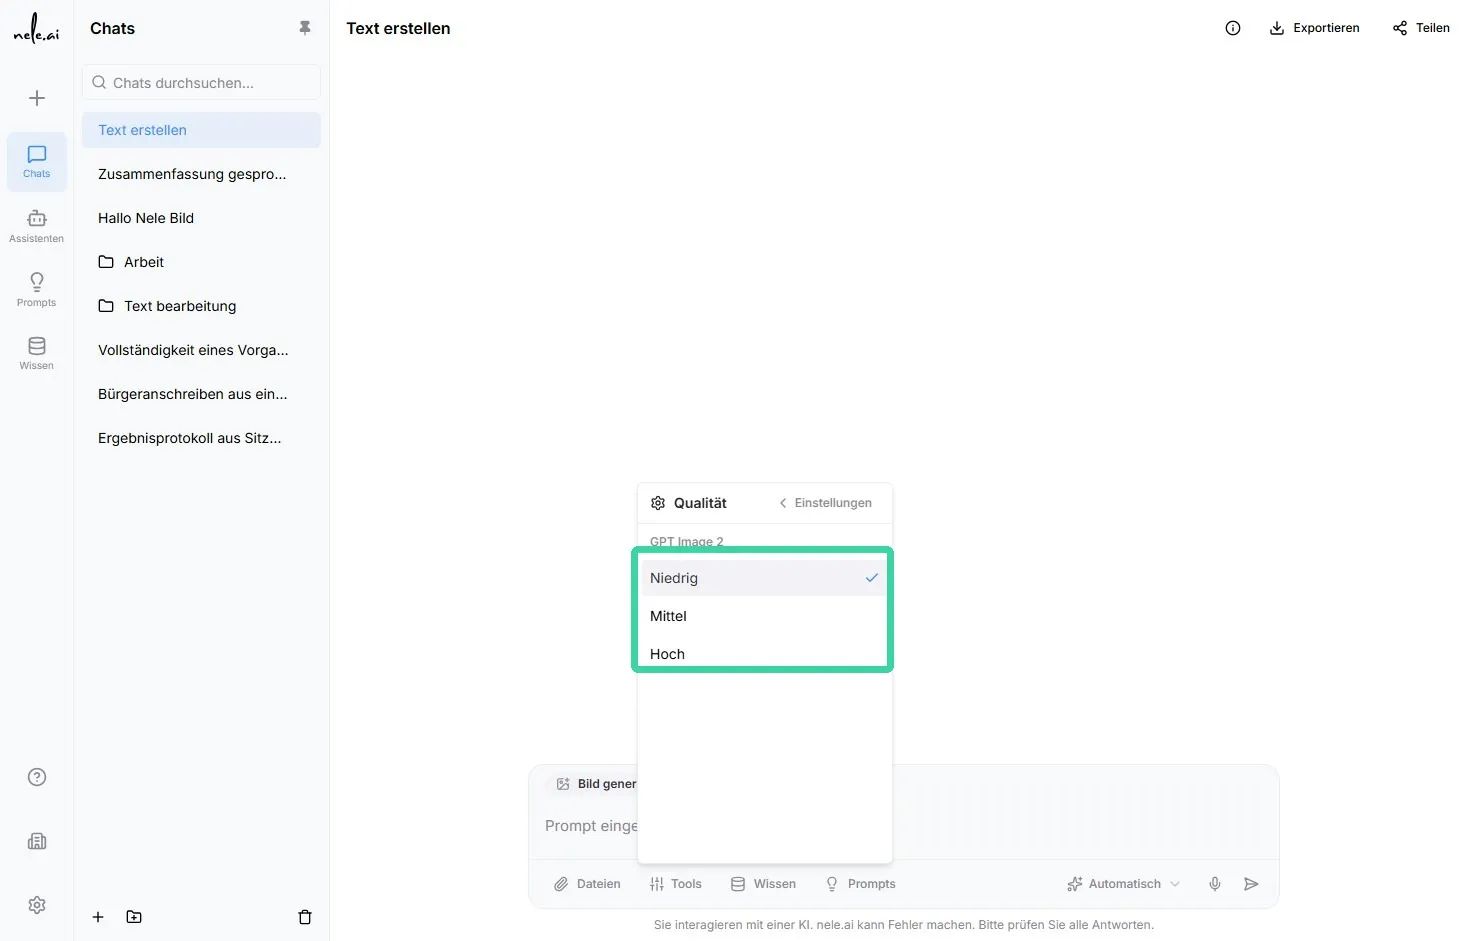
The image quality affects both the level of detail in the result and the generation time.
Quality levels at a glance
- Low:Suitable for quick drafts and initial previews. Generation is usually faster, but the image may contain fewer details.
- Medium:Offers a balanced ratio between speed and image quality. This setting is suitable for most use cases.
- High:Provides greater detail and is particularly suitable for professional results or images intended for further use. Generation may take longer.
Quality selection tip
Start by using the Low or Medium setting to test your prompt. Once the subject and image description are correct, generate the final version using the High quality setting if needed.
Select image format
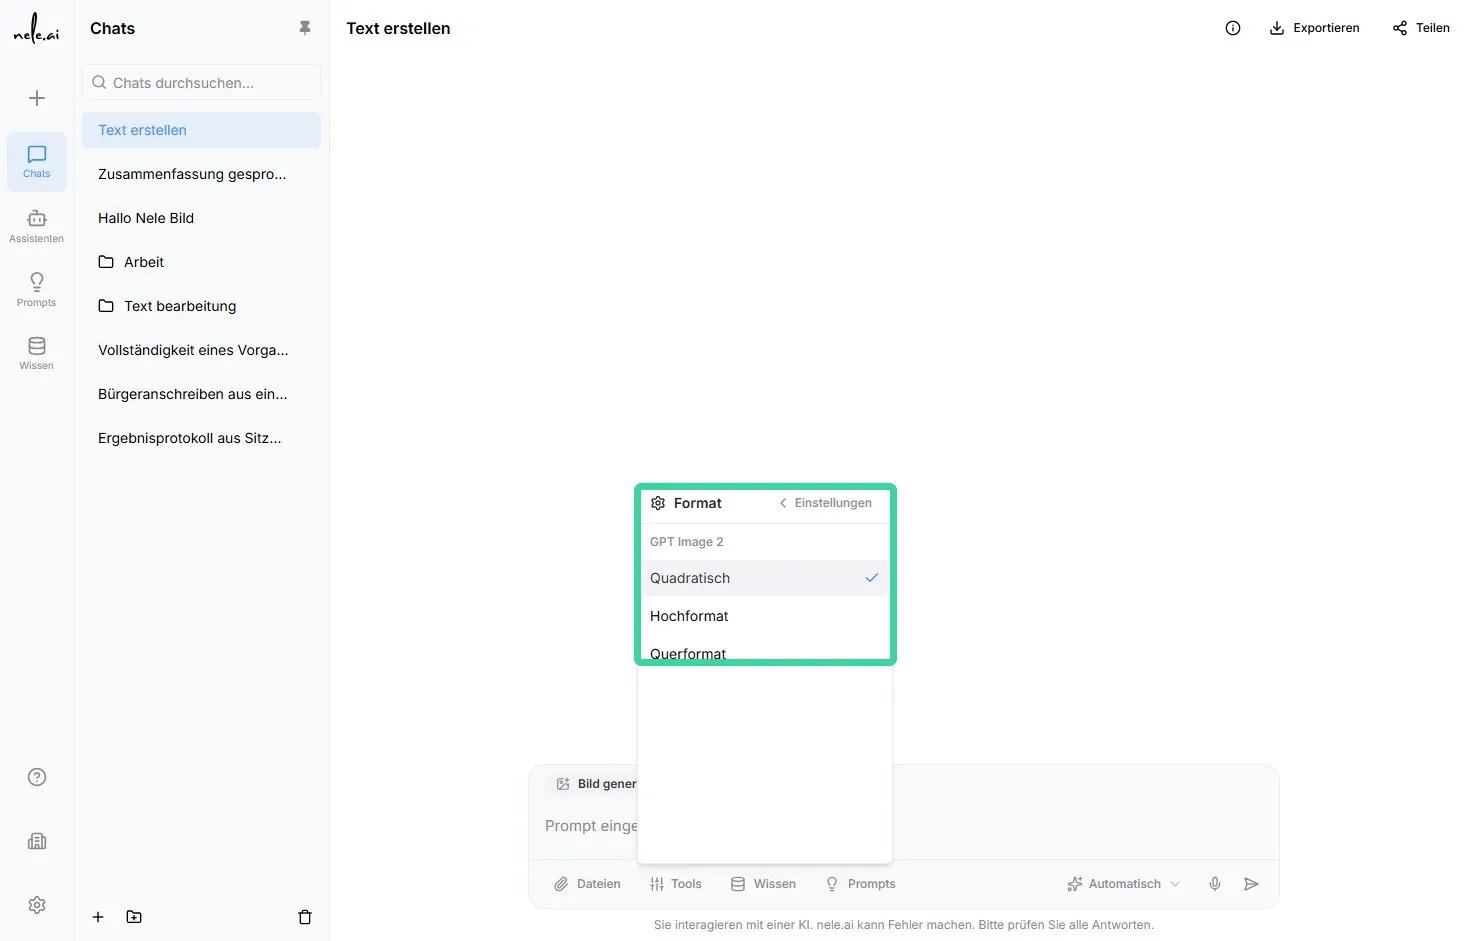
The image format determines whether the generated image is square, portrait, or landscape. Choose the format that best suits your intended use.
Available image formats
- Square:Ideal for profile pictures, social media posts, and compact subjects.
- Portrait:Recommended for portraits, story formats, posters, or vertical content.
- Landscape:Ideal for landscapes, banners, presentation slides, and wide layouts.
Example of format selection
For example: “A square image can be useful for a LinkedIn or Instagram post. Landscape format is often recommended for presentation slides or cover images.”
Tip for choosing the format
Decide on the final medium before generating. Cropping later can cut off important areas of the image or negatively affect its impact.
Editing existing images in the chat
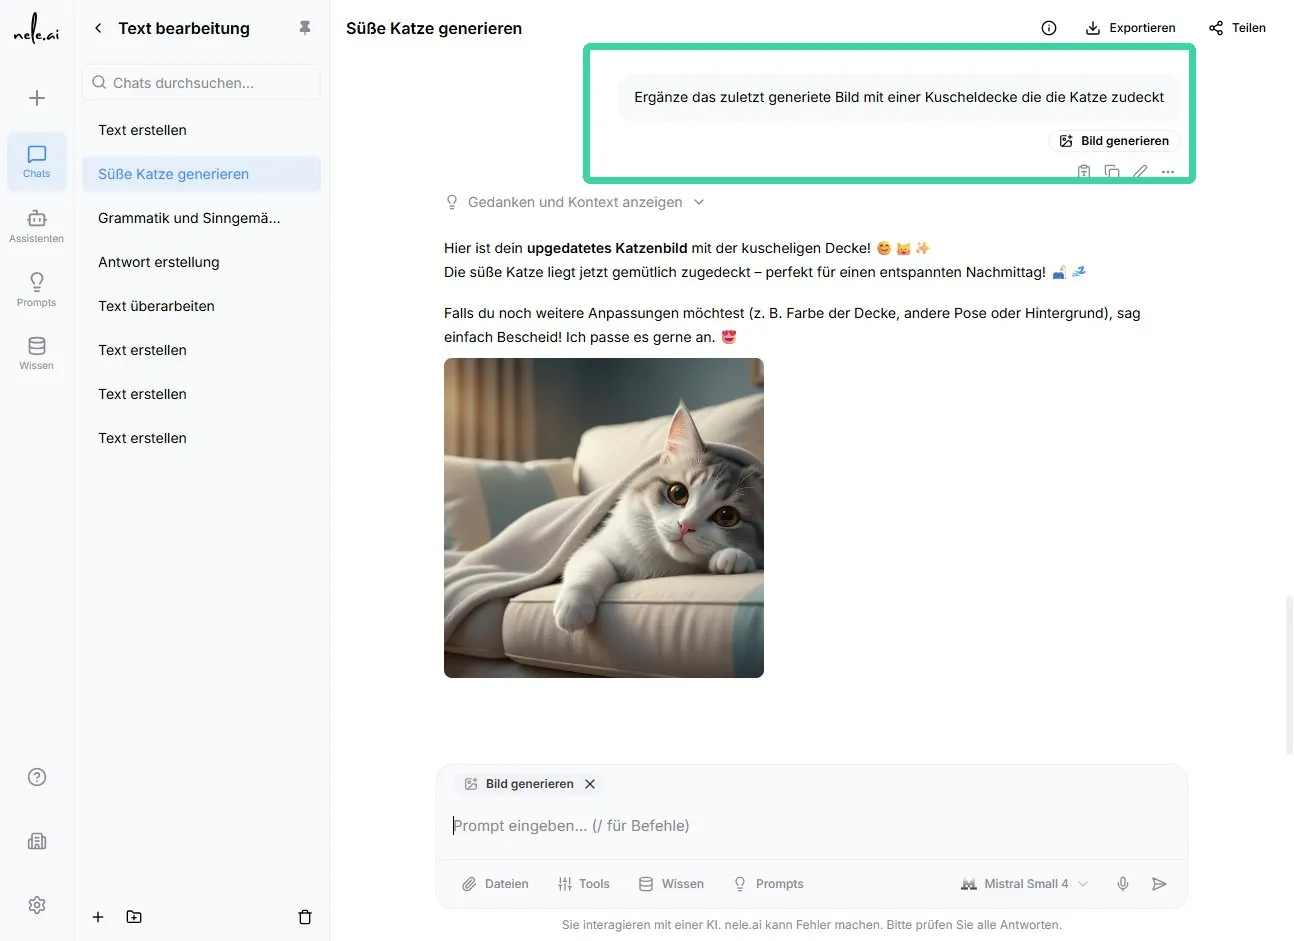
Images that have already been generated can be adjusted directly in the same chat. To do this, enter a clear instruction starting with the word “Add”. Then, describe as precisely as possible which elements should be added to or changed in the image.
How to proceed
- Open the chat containing the image you want to edit.
- Enter your change instruction in the input field.
- Start the instruction with“Add”and describe the desired adjustment.
- Click on“Generate image”to create the edited version.
If multiple images have been created in a chat, please also specify which image should be edited. This ensures that the change is applied to the correct image.
Example
For example: “Add a cozy blanket to the last generated image that covers the cat.”
Important note
Describe changes as clearly as possible. If there are multiple images, specify the position, content, or order of the desired image, for example.