Knowledge bases for expanding your knowledge horizon
Upload documents and website content here to expand your AI model's knowledge base and manage specific information for your company. Created knowledge bases can be used as supplementary information for AI models. The data volume for knowledge bases is limited to a maximum of 2 GB per company. Each document must not exceed a size of 20 MB.Upload documents and content from websites here to expand the knowledge base of your AI model and manage the specific knowledge for your team. Created knowledge databases can be used as additional information for the AI models. The data volume of knowledge databases is limited to a maximum of 2 GB for companies. Each document must not exceed 20 MB in size.
Feature overviewFeature overview
Knowledge Base OverviewKnowledge base overview
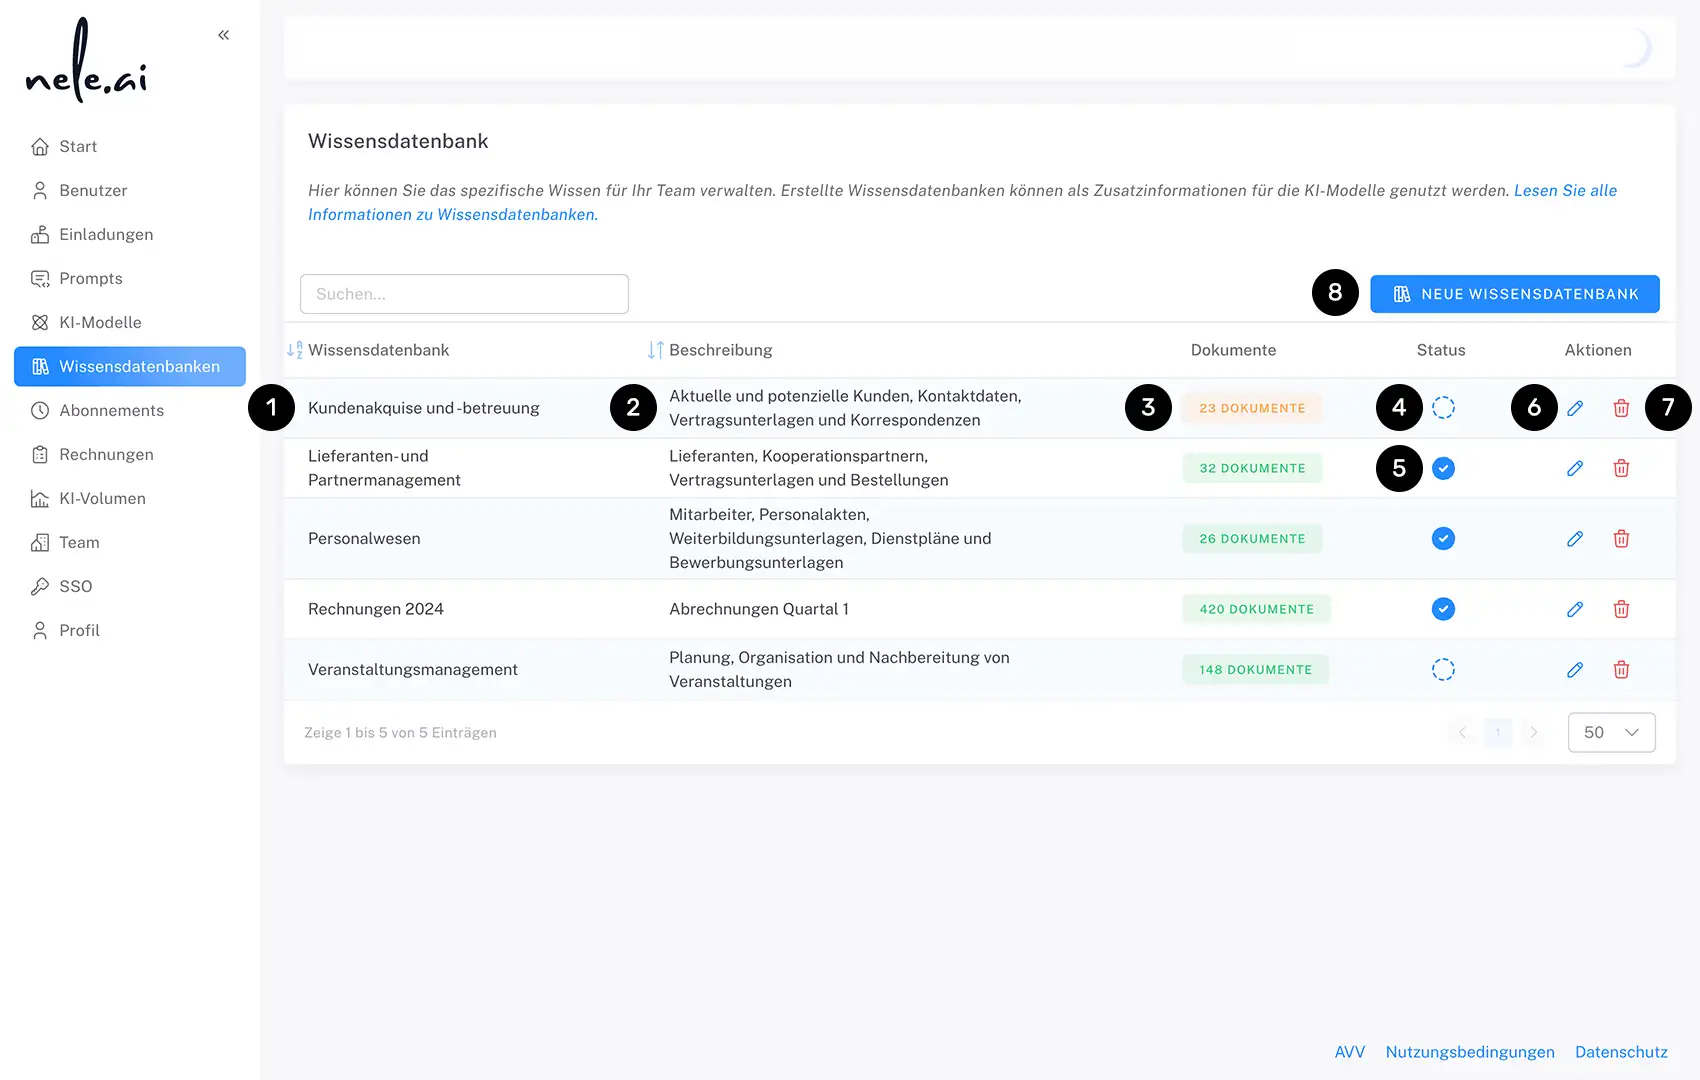
If you have already created a knowledge base, you can view the assigned title (1), the description (2), and the number of integrated documents here (3).If you have already created a knowledge base, you can enter the assigned title here , the description and view the number of integrated documents
The color of the document count indicator shows you whether all integrated documents are actively assigned to members (the indicator is green) or whether individual documents in the database are still marked as drafts (the indicator is orange). If no documents have been added to the knowledge base yet, the indicator is red.The color of the document number note shows you whether all integrated documents are also actively assigned to users (the note is green) or whether individual documents in the database are still marked as drafts (the note is orange). If no documents have been added to the knowledge base yet, the message is red.
Clicking on the document count indicator (3) will take you to the document overview.With one click on the note about the number of documents You get to the document overview.
In the "Status" column, you can activate or deactivate a knowledge base by clicking the checkbox (4). When activating, you can decide whether to make the database available exclusively to your team ("publish") or to assign it directly to members. A database that is both published and assigned is indicated by a blue icon (5). A model that is only published and not yet assigned to any members is indicated by an orange icon.In the “Status” column, you can activate and deactivate a knowledge database by clicking on the checkbox . When activating, you can decide whether you want to make the database available exclusively to your team (= “publish”) or assign it directly to users. A published and simultaneously assigned database is marked by a blue icon . A model that has only been published and is not yet assigned to any users is marked with an orange icon.
You can also edit (6) and delete (7) knowledge bases.You can also edit knowledge bases and delete
To create a new knowledge base, click the "New Knowledge Base" button (8).To create a new knowledge base, click on the “New Knowledge Base” button
Creating a knowledge baseCreating a knowledge base
In the first step, give your knowledge base a title (1) and a description (1a).Start by giving your knowledge base a title and a description
Next, determine which AI model (1b) the database should be based on.Next, determine which AI model the database should be based.
Finally, decide whether the knowledge base should only be published—making it available to the company—or whether it should also be assigned to all members or all groups (1c).Finally, you decide whether the knowledge database should only be published, i.e. made available to the team, or should also already be assigned to all users
Confirm your entries by clicking "Save" or cancel the process by clicking "Cancel" (2).Confirm your entries with “Save” or cancel the process with “Cancel” . After you click Save, you will be taken to the area where you can upload documents.
After clicking Save, you will be taken to the section where you can upload documents (3). Please refer to the list displayed there for the currently supported file types.After you click Save, you will be taken to the area where you can upload documents . The currently supported file types can be found in the list shown there.

Managing and adding documentsManage and add documents
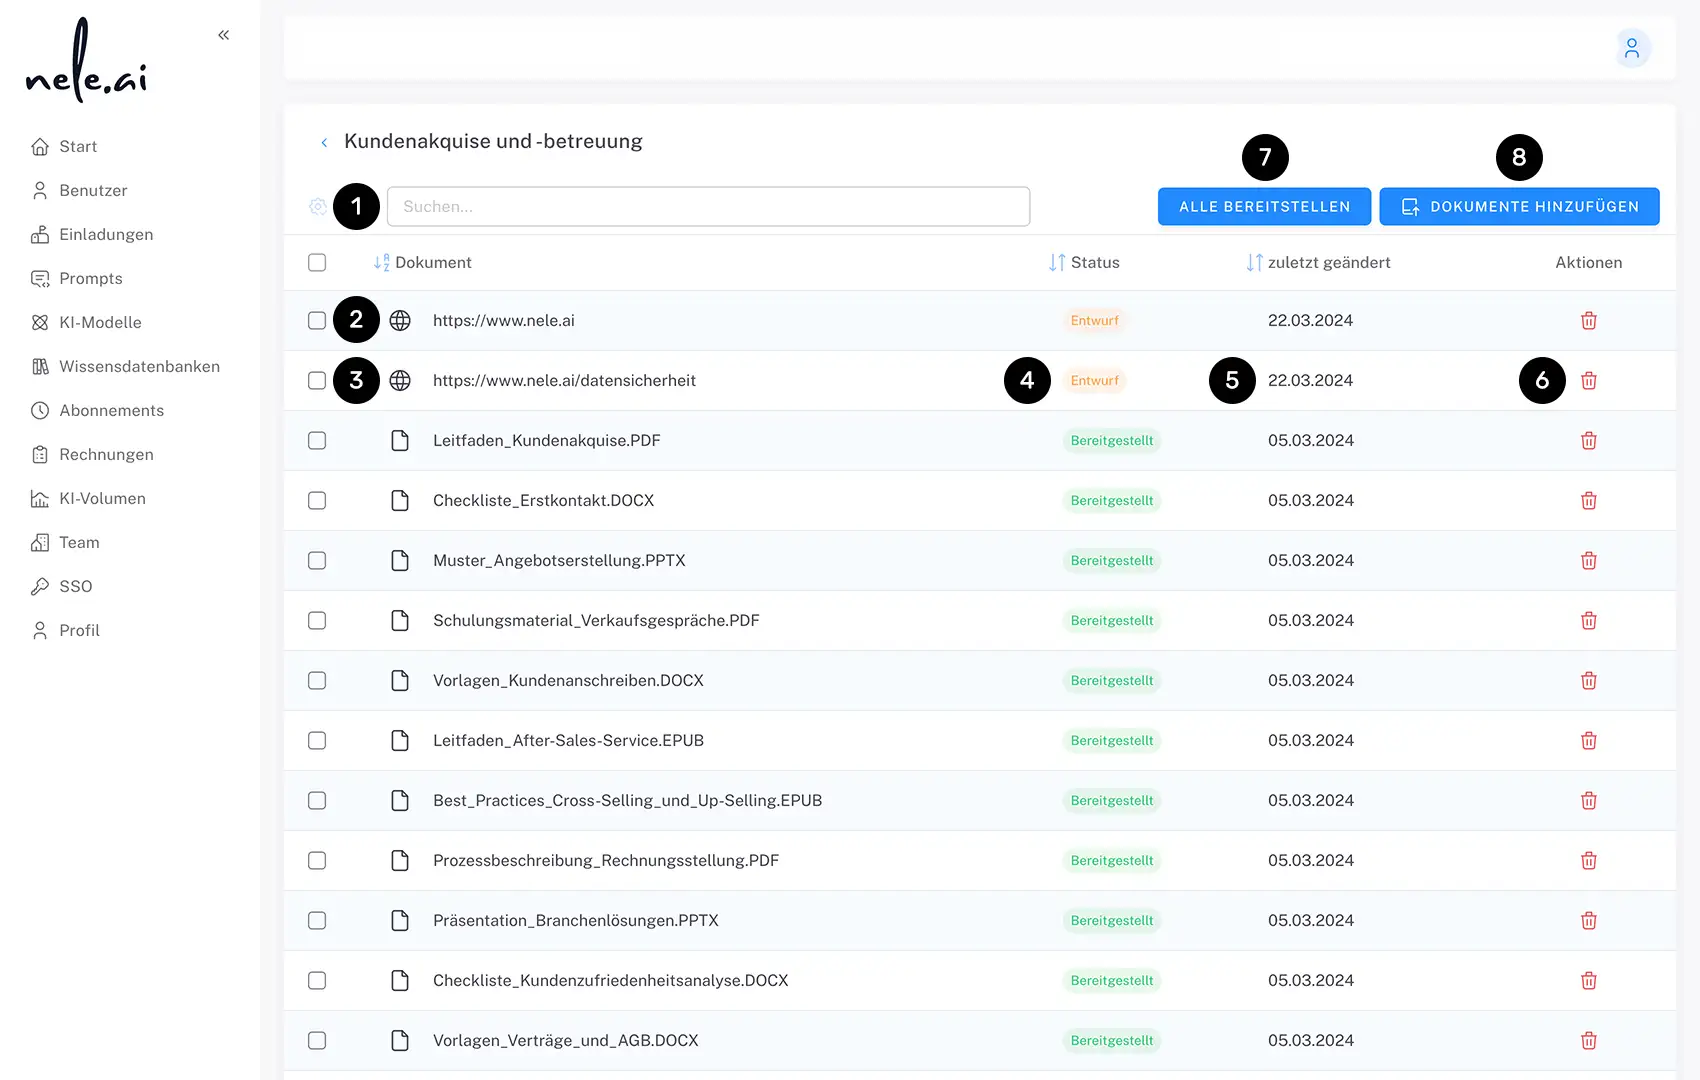
In the knowledge base overview, click on the document count in the "Documents" column (3, see (3, see Knowledge base overview”) to access the document overview.In the knowledge base overview, click on the number of documents in the “Documents” column to access the document overview.
Use the search function (1) to quickly and easily find documents or website URLs that have already been added. When you enter a search term, only the entries that match your search will be displayed.With the search function You can quickly and easily find documents or website URLs that have already been integrated. When you enter a search term, only the entries that match your search are displayed.
Below that, you will see a table listing both the website URLs (2) and the documents (3) included in the knowledge base.Below, you can see both the website URLs integrated in the knowledge database listed in a table as well as integrated documents
You can also see the status of an entry (e.g., "Draft" or "Published") (4) and the date of the last change (5). Under "Actions," you can delete an entry (6).You will also be shown the status of an entry (e.g. “Draft” or “Provided”) and shows the date of the last change . You can delete an entry under “Actions”
If you want to make all documents available to your team, click the "Make all available" button (7).If you want to make all documents available to your team, click on the “Provide all” button
You can add a document or a website URL using the "Add documents" button (8).Add a document or a website URL using the “Add documents” button add.
Including a website URLInclude a website URL
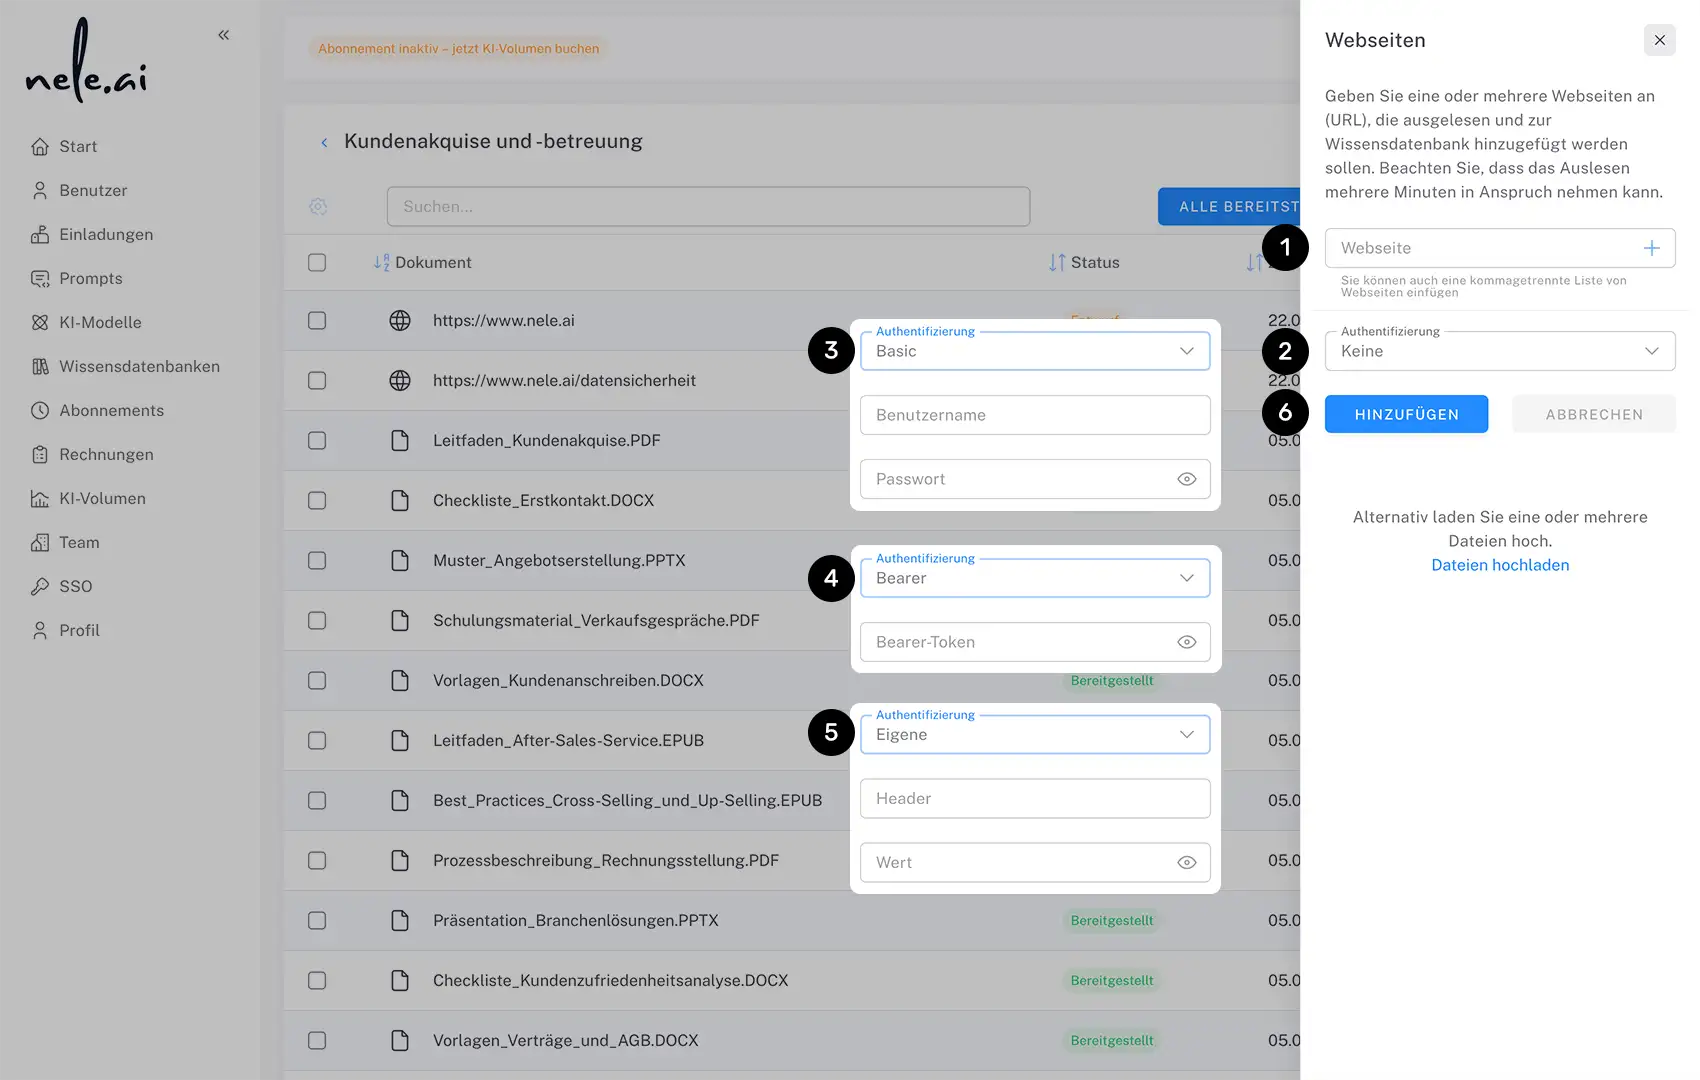
If you choose to include a website URL, you will be redirected to the corresponding section.If you decide to include a website URL, you will be redirected to a corresponding area.
First, enter the URL of the page you wish to include in the "Website" input field and confirm by clicking the plus icon or pressing Enter (1). If you want to include multiple URLs at once, separate them with spaces.First enter the URL of the page that you want to include in the “Website” input field and confirm with the plus icon or the enter key . If you want to include multiple URLs at the same time, separate them with spaces.
Please note that for a website, only the specific section of the URL is read—for example, just the homepage or just a subpage—rather than the entire website.Note that on a website, the specific website area of the URL, such as exclusively the start page or only a subpage, is read out and not the entire Internet presence.
If it is a public website without access restrictions, leave the authentication (2) set to "None".If it is a public website with no access restrictions, leave the authentication alone on “None.”
If the page is password-protected, select "Basic" (3) and enter the appropriate values in the "Username" and "Password" fields.If this is a password-protected page, select “Basic” and enter the appropriate values in the “Username” and “Password” fields.
If you are using the Bearer authentication method, enter "Bearer" and the corresponding bearer token here (4).Use the bearer authentication method, enter “bearer” and the corresponding bearer token here
If your website uses a different type of authentication, you can enter it under the "Custom" option (5).If your website uses another type of authentication, you can enter it under the “Custom” option
Finally, confirm by clicking the "Add" button or cancel the process by clicking "Cancel" (6). After a short wait, the status of your document or URL upload will appear in the "Status" column of the document overview. You can then publish it and/or assign it to members.Finally, confirm using the “Add” button or cancel the process via “Cancel” . The “Status” column on the document overview shows you the status of the document or URL upload after a short waiting period. It can then be published and/or assigned to users.