Setting up automatic login with ADFS
OverviewOverview
- General InformationGeneral information
- Step 1: Provide ADFS metadataStep 1: Provide ADFS metadata
- Step 2: Configure nele.ai SSO and retrieve metadata XMLStep 2: Configure nele.ai SSO and retrieve metadata XML
- Step 3: Set up ADFS Relying Party TrustStep 3: Set up ADFS Relying Party Trust
- Step 4: Configure claim rulesStep 4: Configure claim rules
- Step 5: Transmit groups (required step)Step 5: Send groups (required step)
- Completion and TestingCompletion and testing
General InformationGeneral information
What is ADFS?What is ADFS?
Active Directory Federation Services (ADFS) is a service provided by Microsoft that enables single sign-on (SSO) across organizational boundaries. It acts as an identity provider (IdP) that passes user identities from your organization's Active Directory to external applications like nele.ai as SAML tokens—without the need to transmit passwords.Active Directory Federation Services (ADFS) is a service provided by Microsoft that enables Single Sign-On (SSO) across organizational boundaries. It acts as an Identity Provider (IdP) that passes user identities from your organization's Active Directory to external applications like nele.ai as SAML tokens—without the need to transmit passwords.
Setting this up requires advanced knowledge of SAML 2.0, single sign-on, and your identity provider. Once initialized as described here, login can be configured via the nele.ai administration area under "SSO"nele.ai administration area under "SSO". Since the user and administration areas are integrated into the same application, this section is only visible to members with the appropriate administrator permissions.Setting this up requires advanced knowledge of SAML 2.0, single sign-on, and your identity provider. Once initialized as described here, login can be configured via the . Since the user and administration areas are integrated into the same application, this section is only visible to members with the appropriate administrator permissions.
Members who receive a nele.ai account automatically via single sign-on are not automatically deleted or deactivated. These members can be removed manually via Member Managementmember management if necessary.Members who automatically receive a nele.ai account via single sign-on are not automatically deleted or deactivated. These members can be removed manually via the section if necessary.
Prerequisites:Prerequisites: Before you begin, ensure the following requirements are met: Before you begin, ensure that the following requirements are met:
- A running ADFS server (recommended: Windows Server 2012 or newer)
- Administrative access to both the ADFS server and the nele.ai administration area
- A valid SSL certificate for your ADFS instance
- Clarity regarding your ADFS network topology:
- Is the metadata endpoint accessible from the internet (e.g., via a Web Application Proxy)?
- Can the ADFS server itself access external URLs?
- These two aspects are independent of each other and determine which configuration options are suitable for you in the following steps.
Step 1: Provide ADFS metadataStep 1: Provide ADFS metadata
Before you configure nele.ai, you need the metadata from your ADFS server.Before configuring nele.ai, you will need the metadata from your ADFS server.
If your ADFS metadata endpoint is accessible from the internet (recommended):If your ADFS metadata endpoint is accessible from the internet (recommended):
The Metadata XML URL of your ADFS server generally follows this pattern:The metadata XML URL for your ADFS server typically follows this pattern:
https://[your-adfs-server]/federationmetadata/2007-06/federationmetadata.xmlhttps://[your-adfs-server]/federationmetadata/2007-06/federationmetadata.xml
Make a note of this URL – you will need it in the next step. The important thing here is not whether the ADFS server itself can actively communicate with the internet, but that nele.ai, as an external service, can reach this endpoint from the outside (e.g., via a Web Application Proxy/AD FS Proxy or an appropriate firewall rule).Make a note of this URL – you will need it in the next step. It is not important whether the ADFS server itself can actively communicate with the internet, but rather that nele.ai, as an external service, can reach this endpoint from the outside (e.g., via a Web Application Proxy/AD FS Proxy or an appropriate firewall rule).
Note:Note: You can verify that the metadata is correct and accessible from the outside by opening this URL in a browser from a device outside your internal network (e.g., via a mobile data connection). If configured correctly, an XML file will be displayed. If an error message appears or the page is unreachable, please contact your server administrator. You can verify that the metadata is correct and accessible from the outside by opening this URL in a browser from a device outside your internal network (e.g., using a mobile data connection). If configured correctly, an XML file will be displayed. If an error message appears or the page is unreachable, please contact your server administrator.
If the metadata endpoint is not accessible from the outside:If the metadata endpoint is not accessible from the outside:
Export the Metadata XML file directly from your ADFS server and have it ready for upload.Export the metadata XML file directly from your ADFS server and have it ready for upload.
Step 2: nele.ai – Configure SSO and retrieve Metadata XMLStep 2: nele.ai – Configure SSO and retrieve metadata XML
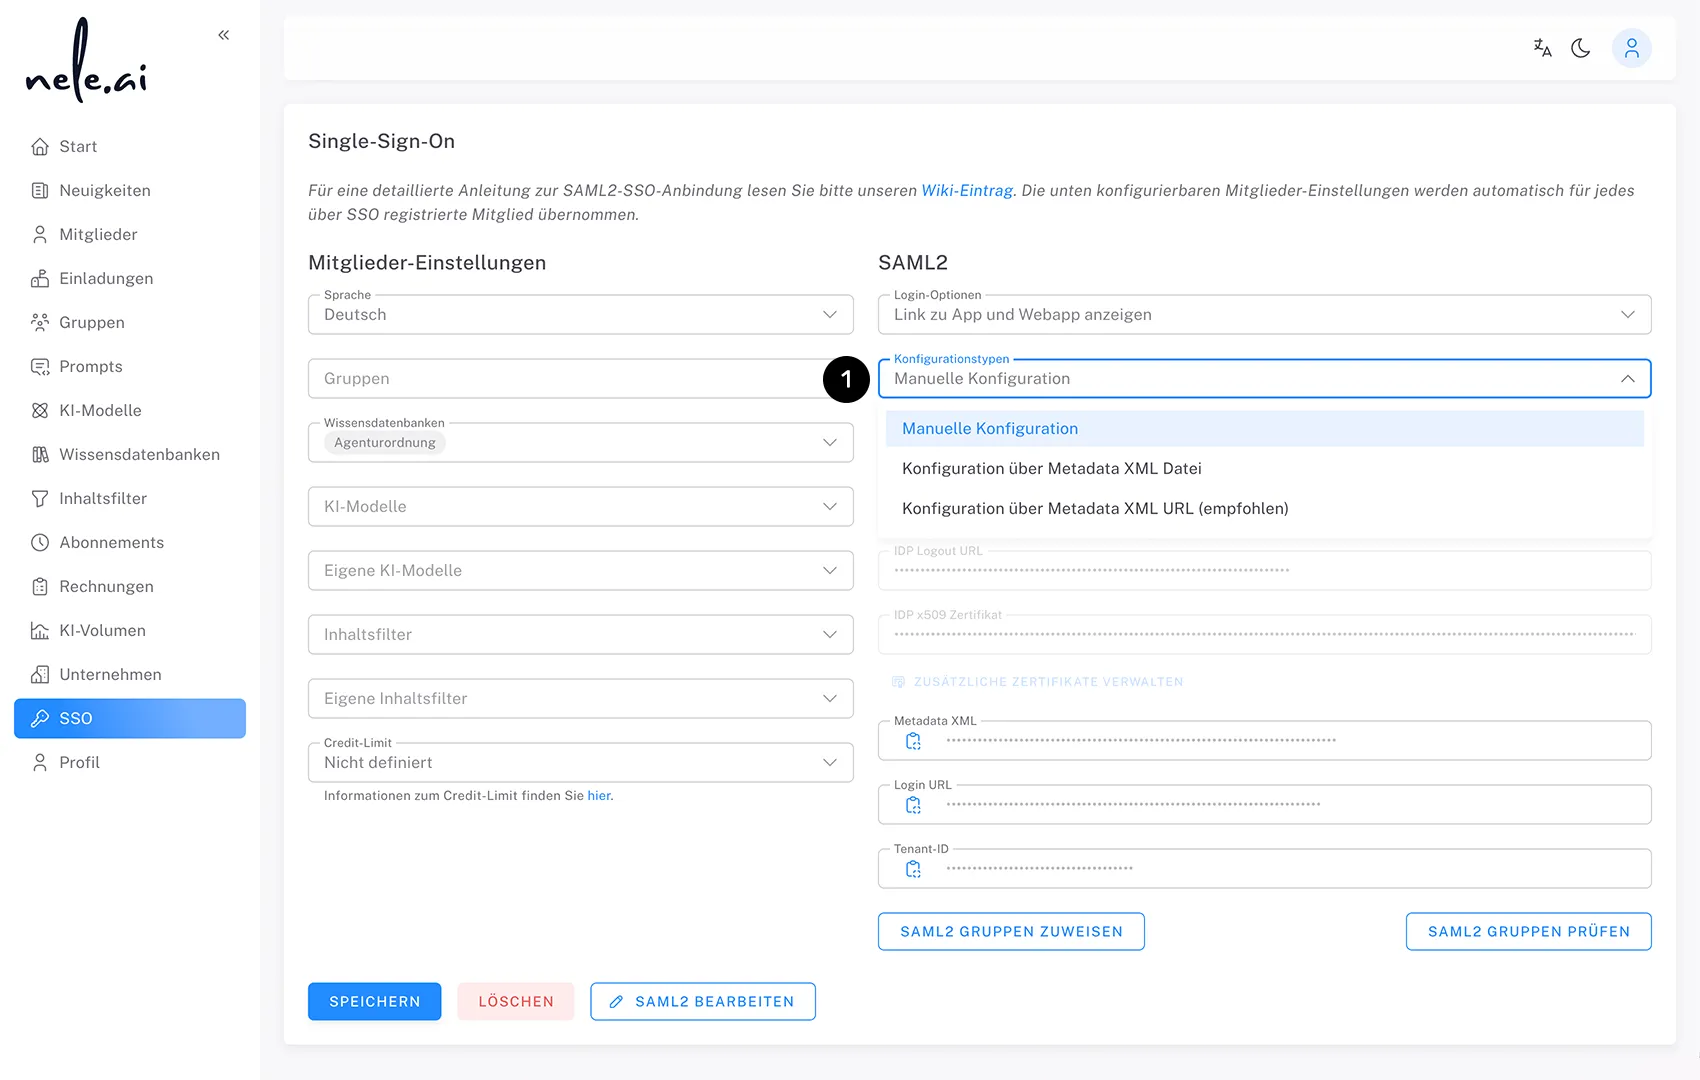
Navigate to the "SSO" menu item in the administration areaSSO menu item in the administration area. There, select the option that matches your environment from the configuration types (1)(1):Navigate to the . There, under the configuration types , select the option that matches your environment:
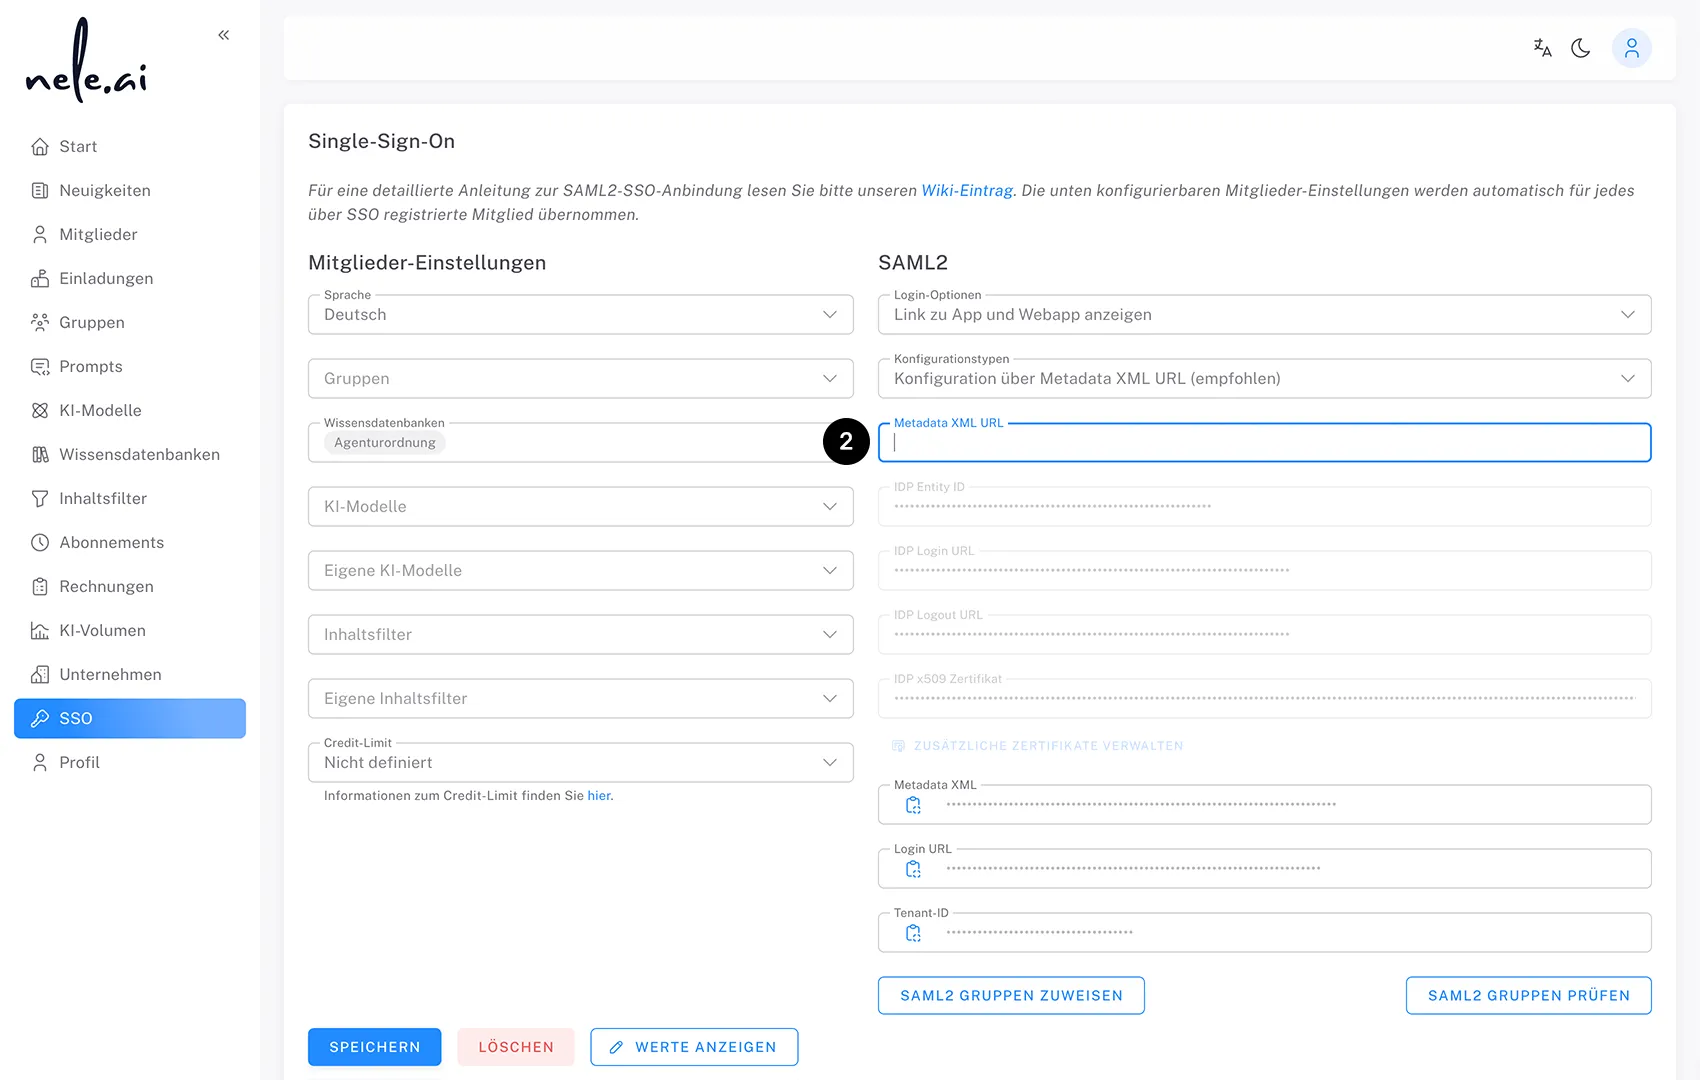
Configuration via Metadata XML URL (2) (recommended):Configuration via metadata XML URL (2) (recommended):
Enter the Metadata XML URL of your ADFS server that you noted in Step 1. This option is only available if your ADFS server's metadata endpoint is accessible from the internet. This method is recommended because nele.ai automatically retrieves the metadata at regular intervals, allowing it to handle certificate renewals without manual intervention (see the note at the end of this document).Enter the metadata XML URL of your ADFS server that you noted in step 1. This option is only available if your ADFS server's metadata endpoint is accessible from the internet. This method is recommended because nele.ai automatically retrieves the metadata at regular intervals, allowing it to handle certificate renewals without manual intervention (see the note at the end of this document).
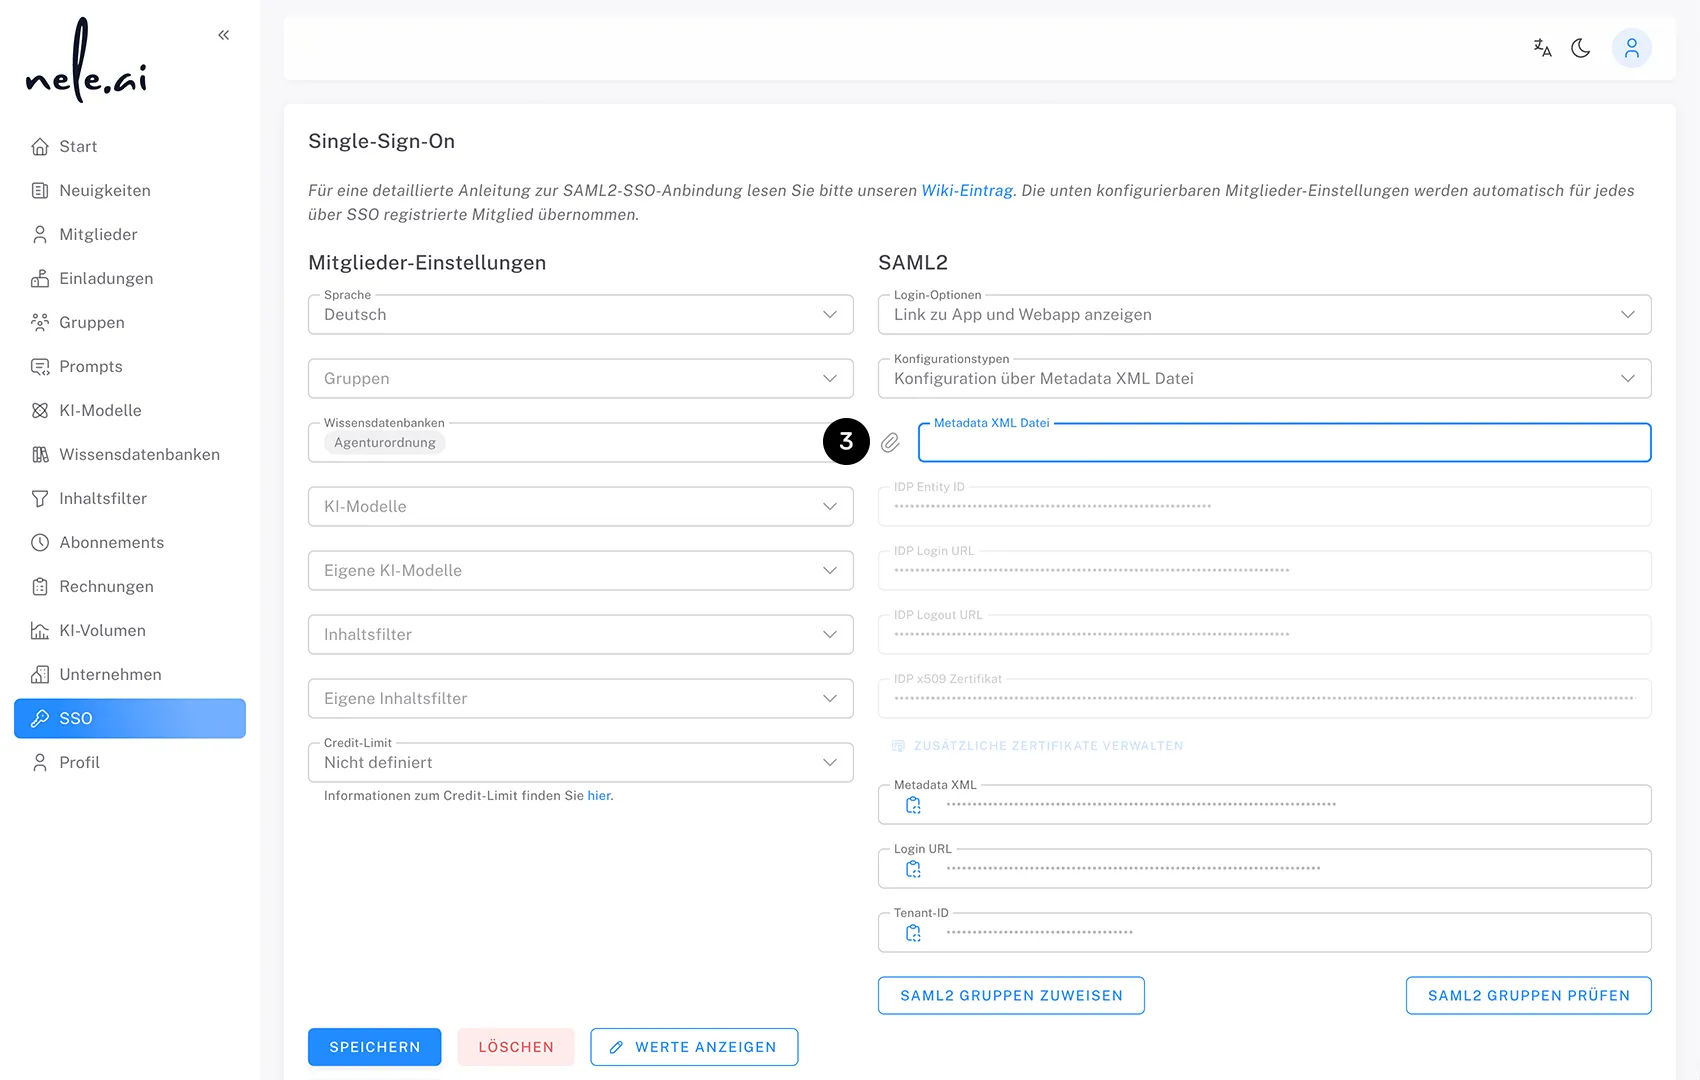
Configuration via Metadata XML file (3):Configuration via metadata XML file (3):
If the metadata endpoint is not accessible from the outside, upload the Metadata XML file exported in Step 1 directly instead. Please note that in this case, no automatic updates will take place, and the file must be re-uploaded manually whenever certificates are changed.If the metadata endpoint is not accessible from the outside, upload the metadata XML file exported in step 1 directly instead. Please note that in this case, no automatic updates will take place, and the file must be re-uploaded manually whenever certificates are changed.
Then click SaveSave. The configuration data will be applied automatically.Then click . The configuration data will be applied automatically.
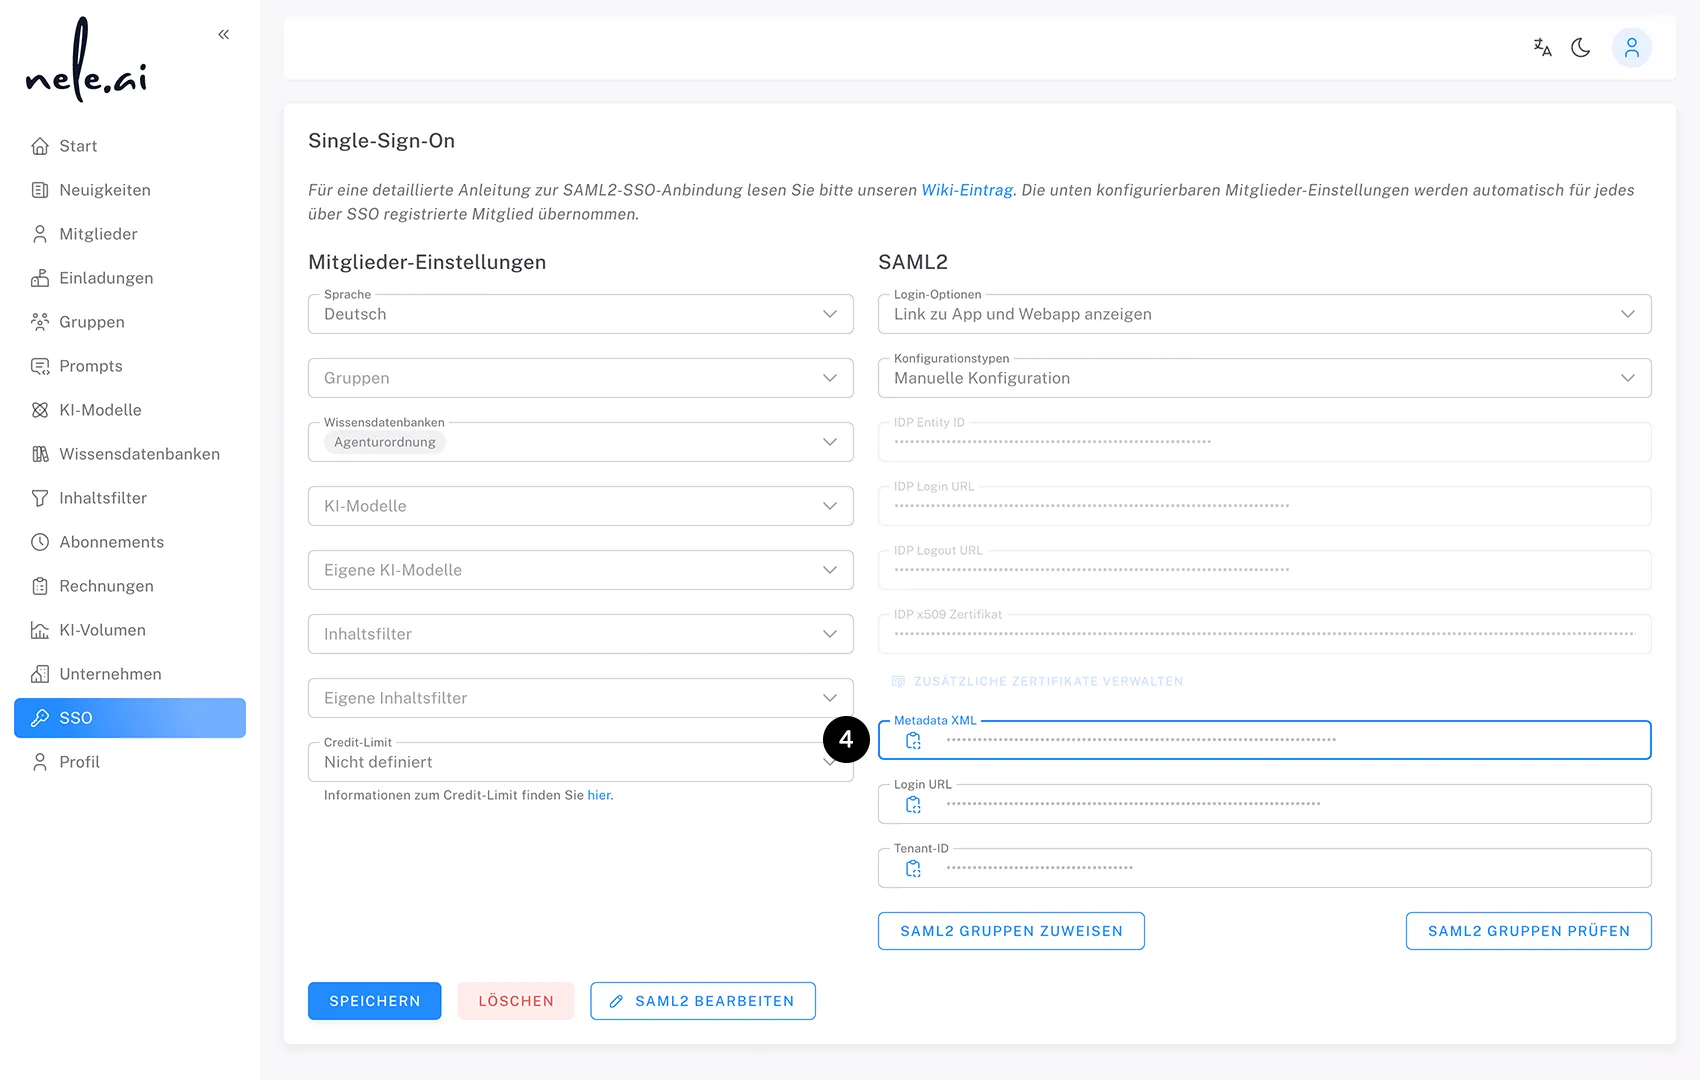
Next, copy the Metadata XML generated by nele.ai (4)(4) or its URL – you will need this for the subsequent configuration on the ADFS side.Copy the metadata XML generated by nele.ai or its URL – you will need this for the subsequent configuration on the ADFS side.
Step 3: ADFS – Setting up a Relying Party TrustStep 3: ADFS – Setting up the Relying Party Trust
A Relying Party TrustRelying Party Trust is the entry in ADFS that defines which external application (in this case: nele.ai) is trusted and what user information may be passed to it.A is the entry in ADFS that defines which external application (in this case: nele.ai) is trusted and which user information may be shared with it.
Go to your ADFS serverADFS server and open the AD FS Management consoleAD FS Management console. Navigate to the Relying Party TrustsRelying Party Trusts folder and right-click to create a new entry. A configuration wizard will open – click NextNext.Go to your and open the . Navigate to the folder and right-click to create a new entry. A configuration wizard will open – click .
For the Data sourceData source, choose the import option that fits your environment:Under , select the import option that matches your environment:
If the ADFS server can access the nele.ai URL via an outbound connection:If the ADFS server can access the nele.ai URL via an outbound connection:
Import data about the relying party published online or on a local networkImport data about the relying party published online or on a local network - Enter the metadata XML URL for nele.ai that you copied in Step 2. This option requires the ADFS server itself to have an outbound internet connection and is independent of whether the ADFS metadata endpoint is accessible from the outside. – Enter the metadata XML URL for nele.ai that you copied in step 2. This option requires the ADFS server itself to have an outbound internet connection and is independent of whether the ADFS metadata endpoint is accessible from the outside.
If no outbound connection is possible:If no outbound connection is possible:
Import data about the relying party from a fileImport data about the relying party from a file - Select the metadata XML file you downloaded from nele.ai. – Select the downloaded metadata XML file from nele.ai.
Click NextNext and enter a descriptive name for the new entry under Display nameDisplay name, e.g., nele.ai. Click NextNext again – the remaining settings will be imported automatically from the XML.Click and enter a descriptive name for the new entry under , e.g., nele.ai. Click again – the remaining settings will be imported automatically from the XML.
Continue by selecting Permit everyonePermit everyone and click NextNext.Next, select and click .
Note:Note: This setting initially grants access to all users. If you wish to restrict access to specific Active Directory groups, this access rule can be adjusted later by right-clicking the entry and selecting Edit Access Control PolicyEdit Access Control Policy.This setting initially grants access to all users. If you wish to restrict access to specific Active Directory groups, this access rule can be adjusted later by right-clicking the entry and selecting .
You can review your settings on the subsequent summary screens. In the final step, leave the checkbox for Open the 'Edit Claim Issuance Policy' dialogOpen the Edit Claim Issuance Policy dialog for this relying party trust when the wizard closes selected so that the window for the claim rules opens automatically. If it does not open automatically, you can right-click the entry and select Edit Claim Issuance Policy...Edit Claim Issuance Policy… manually.You can review your settings on the subsequent summary screens. In the final step, leave the checkbox for selected so that the window for the claim rules opens automatically. If it does not open automatically, you can right-click the entry and select to open it manually.
Step 4: Configure Claim RulesStep 4: Configure claim rules
Claim RulesClaim rules determine which user information (known as claims, e.g., email address or username) is retrieved from Active Directory and passed to nele.ai as part of the SAML token. Two rules are required for nele.ai: one to retrieve the email address and one to transform it into the expected SAML format (Name ID). determine which user information (known as claims, e.g., email address or username) is retrieved from Active Directory and passed on to nele.ai as part of the SAML token. Two rules are required for nele.ai: one to retrieve the email address and one to convert it into the expected SAML format (Name ID).
In the Claim Rules window, first create an initial rule:In the claim rules window, first create an initial rule:
- Click on Click
Add RuleAdd Ruleand select the following as the rule template: and select the following as the rule template:Send LDAP Attributes as ClaimsSend LDAP Attributes as Claims..Next Next.. - Under Under
Attribute storeAttribute storethe entry the entryActive DirectoryActive Directory). . - In the left column, select (In the left column, select (
LDAP attributeLDAP attribute) )Email addressesEmail addressesand in the right column ( and in the right column (Outgoing claim typeOutgoing claim type) also ) alsoEmail addressEmail address). . - Confirm by selecting Confirm by clicking
FinishFinish..
Next, create a second rule:Then create a second rule:
- Click again on Click again on
Add RuleAdd ruleand select and this time selectTransform an Incoming ClaimTransform an incoming claim. Click on . Click onNextNext.. - Configure the following settings:Configure the following settings:
Incoming claim type: E-Mail AddressIncoming claim type: E-Mail AddressOutgoing claim type: Name IDOutgoing claim type: Name IDOutgoing Name ID format: EmailOutgoing Name ID format: Emaill
- Keep the default setting Keep the default setting
Pass through all claimsPass through all claimsand confirm with and confirm withFinishFinish..
Finally, click OKOK to close the editor.Finally, click to close the editor.
Step 5: Transmit groups (required step)Step 5: Transmit groups (Required step)
To ensure users are assigned to the correct SSO groups during automatic login, a separate rule for group transmission must be set up in addition to the claim rules from step 4. SSO groups allow you to manage users in the nele.ai administration area collectively and apply the same settings to them consistently.To ensure users are assigned to the correct SSO groups during automatic login, a separate rule for group transmission must be set up in addition to the claim rules from step 4. SSO groups allow you to manage users in the nele.ai administration area in bulk and apply the same settings to them consistently.
To do this, reopen the Edit Claim Issuance Policy…Edit Claim Issuance Policy… window for the relevant trust (if already closed: AD FS Management → Relying Party Trusts → select the relevant application → select "Edit Claim Issuance Policy..." on the right). Click "Add Rule" and select "Send Claims Using a Custom Rule" as the template. Give the rule a meaningful name and paste the appropriate rule text.To do this, reopen the window for the relevant trust relationship (if already closed: AD FS Management → Relying Party Trusts → select the relevant application → select "Edit Claim Issuance Policy…" on the right). Click "Add Rule" and select "Send Claims Using a Custom Rule" as the template. Give the rule a descriptive name and paste the appropriate rule text.
Targeted transmission of individual groupsTargeted transmission of individual groups
The following rule transmits a single, specifically selected group based on its SID:The following rule is used to transmit a single, specifically selected group based on its SID:
c:[Type == "http://schemas.microsoft.com/ws/2008/06/identity/claims/groupsid", Value == "ID of the group to be transferred"] => issue(Type = "http://schemas.microsoft.com/ws/2008/06/identity/claims/groups", Value = c.Value, Issuer = c.Issuer, OriginalIssuer = c.OriginalIssuer, ValueType = c.ValueType);c:[Type == "http://schemas.microsoft.com/ws/2008/06/identity/claims/groupsid", Value == "ID of the group to be transmitted"] => issue(Type = "http://schemas.microsoft.com/ws/2008/06/identity/claims/groups", Value = c.Value, Issuer = c.Issuer, OriginalIssuer = c.OriginalIssuer, ValueType = c.ValueType);
Replace ID of the group to be transferredID of the group to be transmitted with the actual SID of the desired Active Directory group. In this case, the SID itself is transmitted and displayed in the nele.ai administration area.Replace with the actual SID of the desired Active Directory group. In this case, the SID itself is transmitted and displayed in the nele.ai administration area.
If you would prefer to transmit a meaningful, custom name instead of the SID, use the following variant:If you would prefer to transmit a meaningful, custom name instead of the SID, use the following variant:
c:[Type == "http://schemas.microsoft.com/ws/2008/06/identity/claims/groupsid", Value == "ID of the group to be transferred"] => issue(Type = "http://schemas.microsoft.com/ws/2008/06/identity/claims/groups", Value = "Name for transmission");c:[Type == "http://schemas.microsoft.com/ws/2008/06/identity/claims/groupsid", Value == "ID of the group to be transmitted"] => issue(Type = "http://schemas.microsoft.com/ws/2008/06/identity/claims/groups", Value = "Name for transmission");
Transmitting multiple groups based on a naming patternTransmitting multiple groups based on a name pattern
Alternatively, you can transmit all of a user's groups and filter them subsequently. This requires two consecutive rules:Alternatively, you can transmit all of a user's groups and filter them afterwards. This requires two consecutive rules:
Rule 1 – initially transfers all of the user's groups into an intermediate value:Rule 1 – initially transfers all of the user's groups into an intermediate value:
c:[Type == "http://schemas.microsoft.com/ws/2008/06/identity/claims/windowsaccountname", Issuer == "AD AUTHORITY"] => add(store = "Active Directory", types = ("http://tmp/groups"), query = ";tokenGroups;{0}", param = c.Value);c:[Type == "http://schemas.microsoft.com/ws/2008/06/identity/claims/windowsaccountname", Issuer == "AD AUTHORITY"] => add(store = "Active Directory", types = ("http://tmp/groups"), query = ";tokenGroups;{0}", param = c.Value);
Rule 2 – restricts transmission to groups whose names match a specific pattern. In the following example, only groups starting with "nele-" are transmitted:Rule 2 – restricts the transmission to groups whose names match a specific pattern. In the following example, only groups starting with "nele-" are transmitted:
c:[Type == "http://tmp/groups", Value =~ "^(?i)nele-"] => issue(Type = "http://schemas.microsoft.com/ws/2008/06/identity/claims/groups", Value = c.Value);c:[Type == "http://tmp/groups", Value =~ "^(?i)nele-"] => issue(Type = "http://schemas.microsoft.com/ws/2008/06/identity/claims/groups", Value = c.Value);
Adjust the naming pattern in Rule 2 to match your specific group naming convention in Active Directory.Adjust the name pattern in Rule 2 to match your own group naming convention in Active Directory.
Finally, click OKOK to close the editor and save the configured rules.Finally, click to close the editor and save the configured rules.
Completion and TestingCompletion and testing
You can test a successful configuration using the login URL in the SSO section of the administration area. Access this URL—if set up correctly, you will be redirected to your identity provider, where you can log in with your credentials.You can test a successful configuration using the login URL in the SSO section of the administration area. Access this URL; if set up correctly, you will be redirected to your identity provider, where you can log in with your credentials.
After a successful login, you will be redirected to an overview page where you can choose, among other things, whether you want to log in to the desktop app or the web app. Alternatively, you can download nele.ai for various operating systems there.After a successful login, you will be redirected to an overview page where you can choose, among other things, whether you want to log in to the desktop app or the web app. Alternatively, you can download nele.ai for various operating systems there.
Note on certificate renewal: Note on certificate renewal: nele.ai can only update certificates automatically if your ADFS server's metadata endpoint is permanently accessible from the internet (configured via Metadata XML URL, see steps 1 and 2). If the Metadata XML file was uploaded manually instead, no automatic update will occur—in this case, the certificates will eventually expire, and users will no longer be able to log in. Resolve this in good time by either re-importing the current Metadata XML from nele.ai into ADFS or re-uploading the current Metadata XML from your ADFS server into nele.ai.nele.ai can only update certificates automatically if your ADFS server's metadata endpoint is permanently accessible from the internet (configured via Metadata XML URL, see steps 1 and 2). If the metadata XML file was uploaded manually instead, no automatic update will occur—in this case, the certificates will eventually expire and users will no longer be able to log in. Resolve this in good time by either re-importing the current metadata XML from nele.ai into ADFS or by re-uploading the current metadata XML from your ADFS server into nele.ai.