Microsoft Office add-ins by nele.ai
With nele.ai Office add-ins, you can complete your daily tasks in Word and Excel without sacrificing the convenience and power of nele.ai.With nele.ai's Office Add-ins, you can complete your daily tasks in Word and Excel without sacrificing the convenience and power of nele.ai.
OverviewOverview
- Add-in compatibilityAdd-in compatibility
- Download add-insDownload add-ins
- Setting up the add-insSet up the add-ins
- Working with the Word add-inWork with the add-in for Word
- Working with the Excel add-inWork with the add-in for Excel
Add-in compatibilityAdd-in compatibility
Developed for Office 365, backward compatibility available upon requestDesigned for Office 365, backwards compatibility upon request
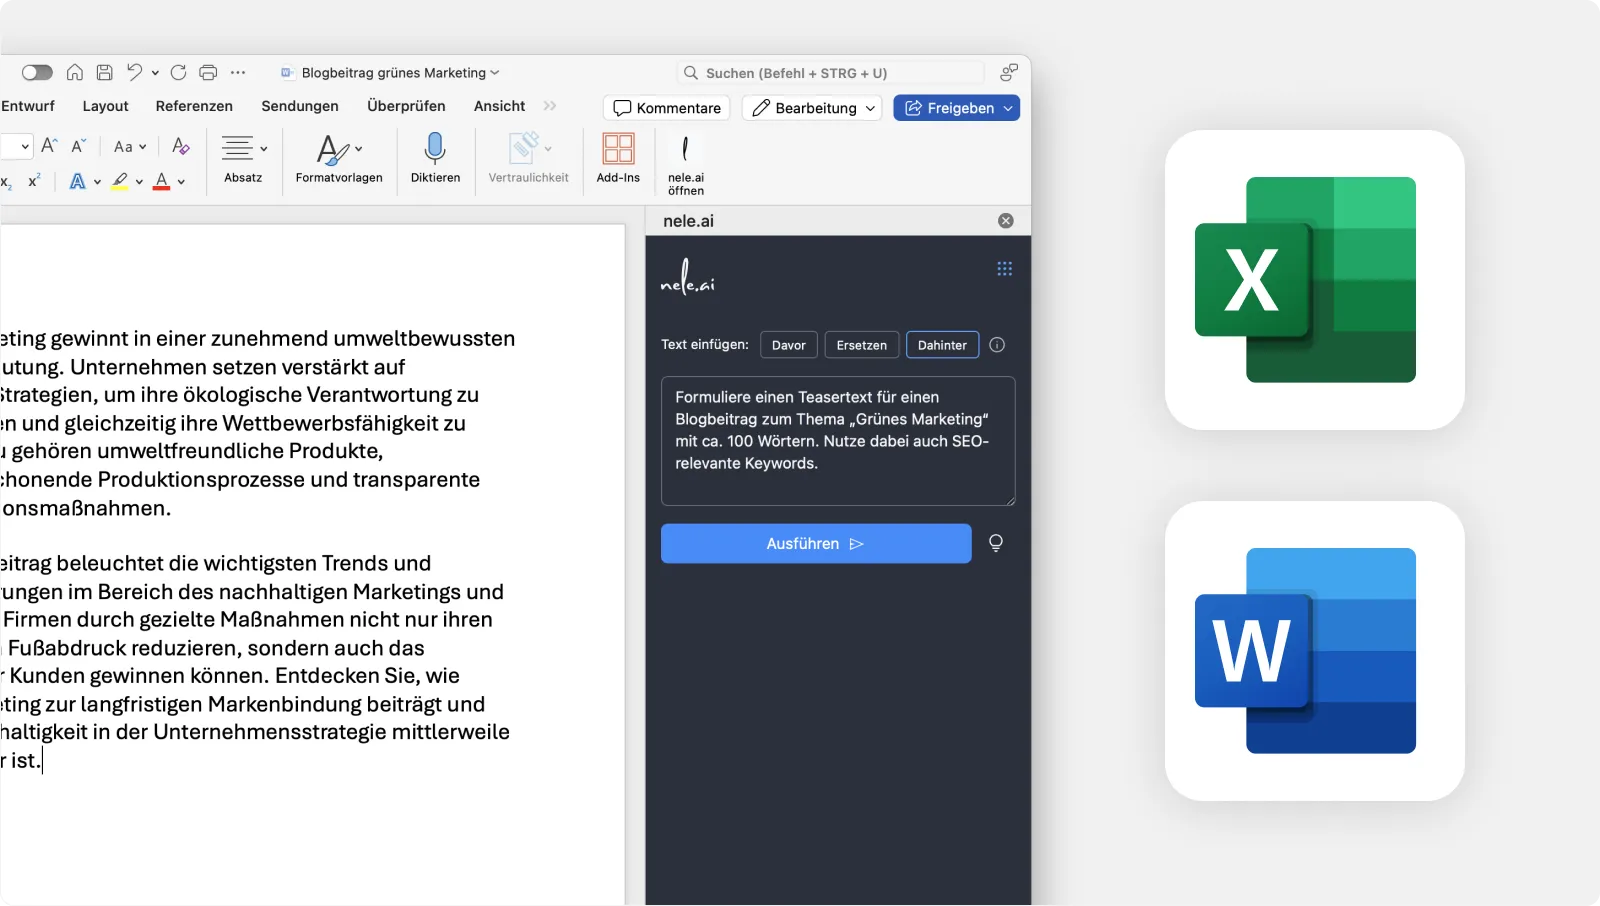
The new nele.ai add-ins for Word and Excel are currently available exclusively for Office 365 users. They allow you to work with nele.ai directly within Word and Excel. Please note that the add-ins are not compatible with older versions of Office, as they were specifically developed for the cloud and online features of Office 365. If you would like to use the advanced features of nele.ai, please ensure you have an active Office 365 subscription. This allows you to benefit from the latest tools designed to boost your productivity and efficiency in Word and Excel.
Feel free to contact us if you are still using older versions of Office and are interested in the nele.ai add-ins. If there is sufficient demand, we can also offer suitable add-ins for these versions. Please send your request to support@nele.ai.The new Nele.ai add-ins for Word and Excel are currently only available to Office 365 users. This allows you to work with nele.ai directly in Word and Excel. Please note that the add-ins are not compatible with older versions of Office as they were developed specifically for the cloud and online features of Office 365. If you want to use the advanced features of nele.ai, make sure you have an active Office 365 subscription. This allows you to benefit from the latest tools that increase your productivity and efficiency in Word and Excel.Feel free to contact us if you are still working with older versions of Office and are interested in the Nele.ai add-ins. If required, we can also offer suitable add-ins for this purpose. Please send your request to
Download add-insDownload add-ins
Download via the Microsoft Add-in StoreDownload via Microsoft AppSource
The add-ins for Word and Excel are available from Microsoft. Your IT department may need to enable them for users.The add-ins for Word and Excel are available from Microsoft AppSource. Users may need to be approved by an administrator.
Download directly in Word or ExcelDownload directly to Word or Excel
- Open Word or Excel.
- Click on "Add-ins" in the menu bar.
- Enter "nele.ai" in the search bar.
- Select the appropriate add-in and click "Add".
- The add-in will now appear in the menu bar.
Setting up the add-insSet up the add-ins
Step 1: Generate an API keyStep 1: Generate an API key
After installing the add-ins, you must enter an API key, as it is required to use them. You can obtain one as follows:After installing the add-ins, you must enter an API key, as this is required to use the add-ins. You can obtain it as follows:
- Switch to your nele.ai application.
- Navigate to the general program settings by clicking on the user icon and then selecting "Settings" from the menu.general program settings by clicking on the user icon and then selecting “Settings” from the menu.
- Select "API" in the settings sidebar. Here, you can generate an API key to use the nele.ai add-ins for Word and Excel.
- Enter a descriptive name in the "Name" field so you can identify the key (e.g., "nele add-ins Word and Excel").
- Enter an expiration date under "Expires on" or clear the date if you want the key to be valid indefinitely. In this case, there will be no time limit on using the add-ins.
- Then click on "Create API key" to generate the key.
- Your API key will then appear as a long string of numbers and letters. You can copy the key to your device's clipboard using the icon next to it. Please note that the key will no longer be accessible once you close the nele settings or nele.ai. After that, it can only be deleted, but not viewed, adjusted, or copied.
You can also find further instructions on how to create an API key herehere.You can also find further instructions on how to create an API key
Step 2: Activate the add-ins using the API keyStep 2: Activate the add-ins with the API key
This process is only necessary once if you have generated an API key without an expiration date. If you have set an expiration date for the key, you may need to generate and enter a new key after that date. This process is only required once if you have generated an API key without an expiration date. If you have given the key an expiration date, a key may have to be generated and entered again after this date.
Once you have generated a key—with or without an expiration date—proceed as follows:If you have generated a key - with or without an expiration date - proceed as follows:
- Switch to the application where you want to use a nele.ai add-in, in this case Word or Excel.
- Open the nele.ai add-in via the Word or Excel menu bar. The add-in is listed there on the right side of the "Home" tab. After clicking the corresponding icon, the nele.ai add-in will appear as a sidebar on the right side of the program.
- You will now be prompted in this sidebar to enter your generated API key. Paste it into the corresponding input field and then confirm by pressing the Enter key. The nele.ai add-in is now fully ready for you to use.
Working with the Word add-inWork with the add-in for Word
Insert textInsert text
With the "Insert text" function, you can determine where text generated by the add-in should be inserted.With the “Insert text” function, you can specify where text generated by the add-in should be inserted.
- BeforeBefore: The response from nele.ai is inserted before the cursor position or the currently selected text in the document.
- ReplaceInbetween: The currently selected text in the document is replaced by the response from nele.ai.
- AfterBehind: The response from nele.ai is inserted after the currently selected text in the document.
Input field ("Enter prompt")Input field (“Enter prompt”)
You can formulate your own instructions (prompts) in the sidebar's input field. The response is automatically inserted at the position of your cursor in the Word document or Excel cell, or where you previously specified under "Insert text."In the sidebar input field, you can write your own instructions (prompts). The answer is automatically inserted in the Word document or Excel cell where your cursor is located or that you have previously defined under “Insert text.”
Accessing your prompt libraryAccess to your Prompt library
You can access your prompt library via the lightbulb icon to the right of the execute button and run a prompt directly from there.The light bulb icon to the right of the run button allows you to access your prompt library and execute a prompt directly from there.
Menu and settingsMenu and settings
Additional sections are available via the menu icon in the top right corner of the sidebar. Here, for example, you can access the add-in settings. There, you have the option to select the desired AI model for the add-in to use. You can also change your API key if necessary.The menu icon at the top right of the sidebar provides you with additional areas. Here, for example, you can access the add-in settings. There, you can select the desired AI model that the add-in works with. You can also change your API key if needed.
You can also access the nele.ai web app and the manual via the menu.The menu also gives you access to the NELE.AI-Webb app and manual.
Working with the Excel add-inWork with the add-in for Excel
When working with the Excel add-in, we distinguish between two different approaches:When working with the Excel add-in, we differentiate between two different procedures:
- Text generation via the right sidebar
- Executing functions within Excel using function commands
This clear distinction enables efficient use of the add-in and helps you perform your desired tasks quickly and precisely.This clear distinction enables efficient use of the add-in and helps you to perform the desired tasks quickly and specifically.
Method 1: Text generation via the sidebar - Enter promptText creation via the sidebar - enter promptly
The add-in's right sidebar allows users to write text while providing support for working in Excel.The add-in's right sidebar allows users to write texts while also providing assistance when working with Excel.
In the "Enter prompt" field, you can formulate your own prompts. The response will be inserted into the selected Excel cell. Use the "Before," "Replace," and "After" buttons to determine whether the text should be inserted before the current position, replace the selected text, or be inserted after it.In the “Enter Prompt” field, you can create your own prompts. The answer is inserted into the selected Excel cell. With the “Before”, “Replace” and “Behind” buttons, you can specify whether the text should be inserted before the current position, the selected text should be replaced, or the text should be inserted behind it.
Method 2: Executing a function within ExcelPerform a function within Excel
There are a total of five functions available that you can use in Excel with the nele.ai add-in in this way. There are a total of five functions available that you can use in this way with the Nele.ai add-in in Excel.
To do this, select a cell in your document and enter the command =nele . Excel will then suggest a list of the five functions. Select one of them to execute it.To do this, select a cell in your document and enter the command one. Excel then suggests a list of the five functions. Select one of them to run.
NELE.CLASSIFY
Use this function to assign the content of a cell to specific categories that you have defined.
NELE.EXTRACT
Extract specific data from a table cell. To do this, enter the cell and specify the desired information, such as “e-mail addresses”, to be extracted.
NELE.PROMPT
You can use this function to create a freely formulated command and send the contents of table cells to the language model.
NELE.SUMMARIZE
Summarize content directly in Excel. Simply enter the text (this can be a cell) and the desired form of the summary, e.g. number of words or list.
NELE.TRANSLATE
Translate your content directly into a language supported by the language model. Enter the text in the formula (this can be a cell), the source language (e.g. EN) and the target language (e.g. DE). This allows you to carry out large quantities of translations quickly and efficiently.