
View and manage users
You can manage your team's user accounts here.
Feature overview
- Add, delete, and find users
- Assigning settings and permissions
- Customize and manage your profile
- Assigning and managing groups
- View authorization overview
- Authorizations in the admin area and for knowledge databases
- Allowed AI models
- Allowed knowledge bases
- Assigned content filters
- Set credit limit
- Manage multiple users at the same time
Add, delete, and find users

Use the “Invite user” button to add a new user (1). You will be redirected to the “Invitations” section. Removing a user is done via the “Delete” section (2) settled.
With the search function (3) You can quickly and easily find users that have already been created. When you enter a search term, the user overview only shows the entries that match your search. You can also filter the view by groups (4).
Assigning settings and permissions
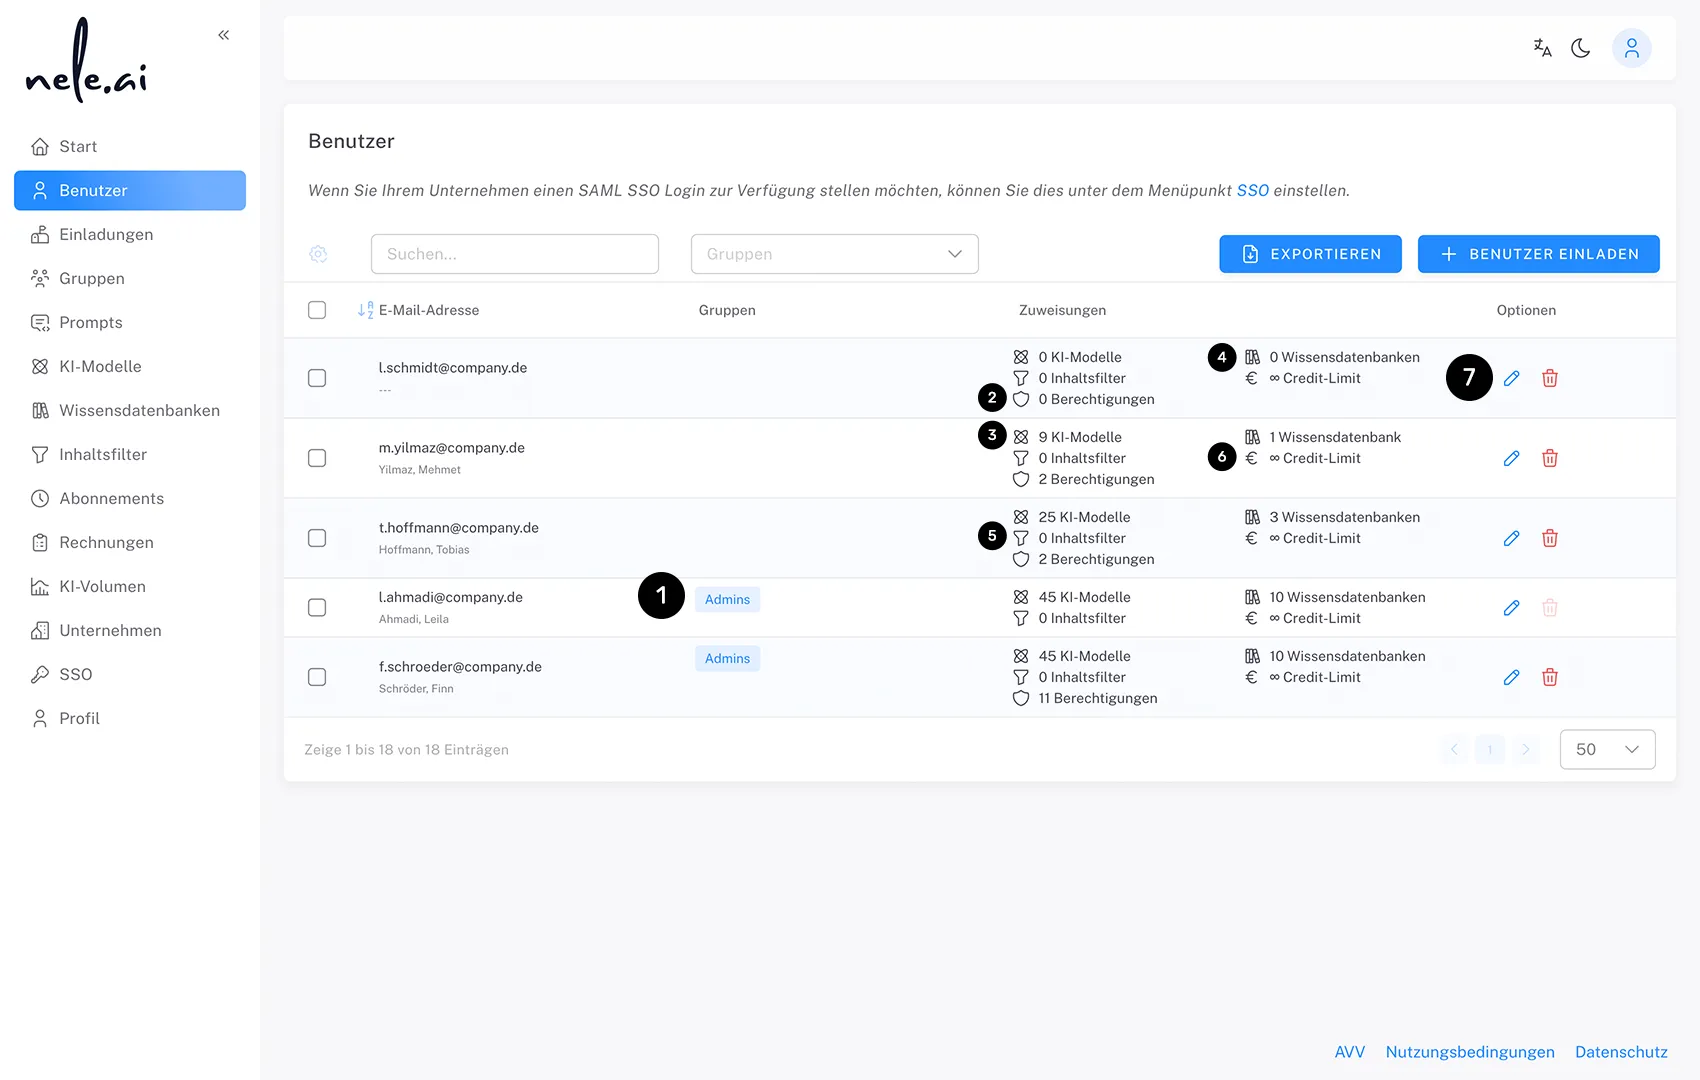
You can assign the following properties to each user:
Group memberships (1), permissions within the admin area (2)AI models that can be used by the person (3), knowledge databases (4) As well as content filter (5). A credit limit per month can also be set here for each user (6). Click on the pencil icon to adjust (7).
The user overview shows the assigned groups of each user in the “Groups” column, which gives you a quick overview of the group memberships.
Customize and manage your profile

Click on the pencil icon on the entry for which you want to edit a user's profile information. An overlay opens, in which you then select the “Profile” item in the navigation above (1).
About the email input fields (2), first name (3) and last name (4) Can a user's corresponding information be adjusted retrospectively.
If the email address is changed, the adapted user has full access to their account and content at the newly entered email address. From this point on, the previously used address can no longer be used to log in. In future, all system emails will also be sent to the new e-mail address.
Assigning and managing groups
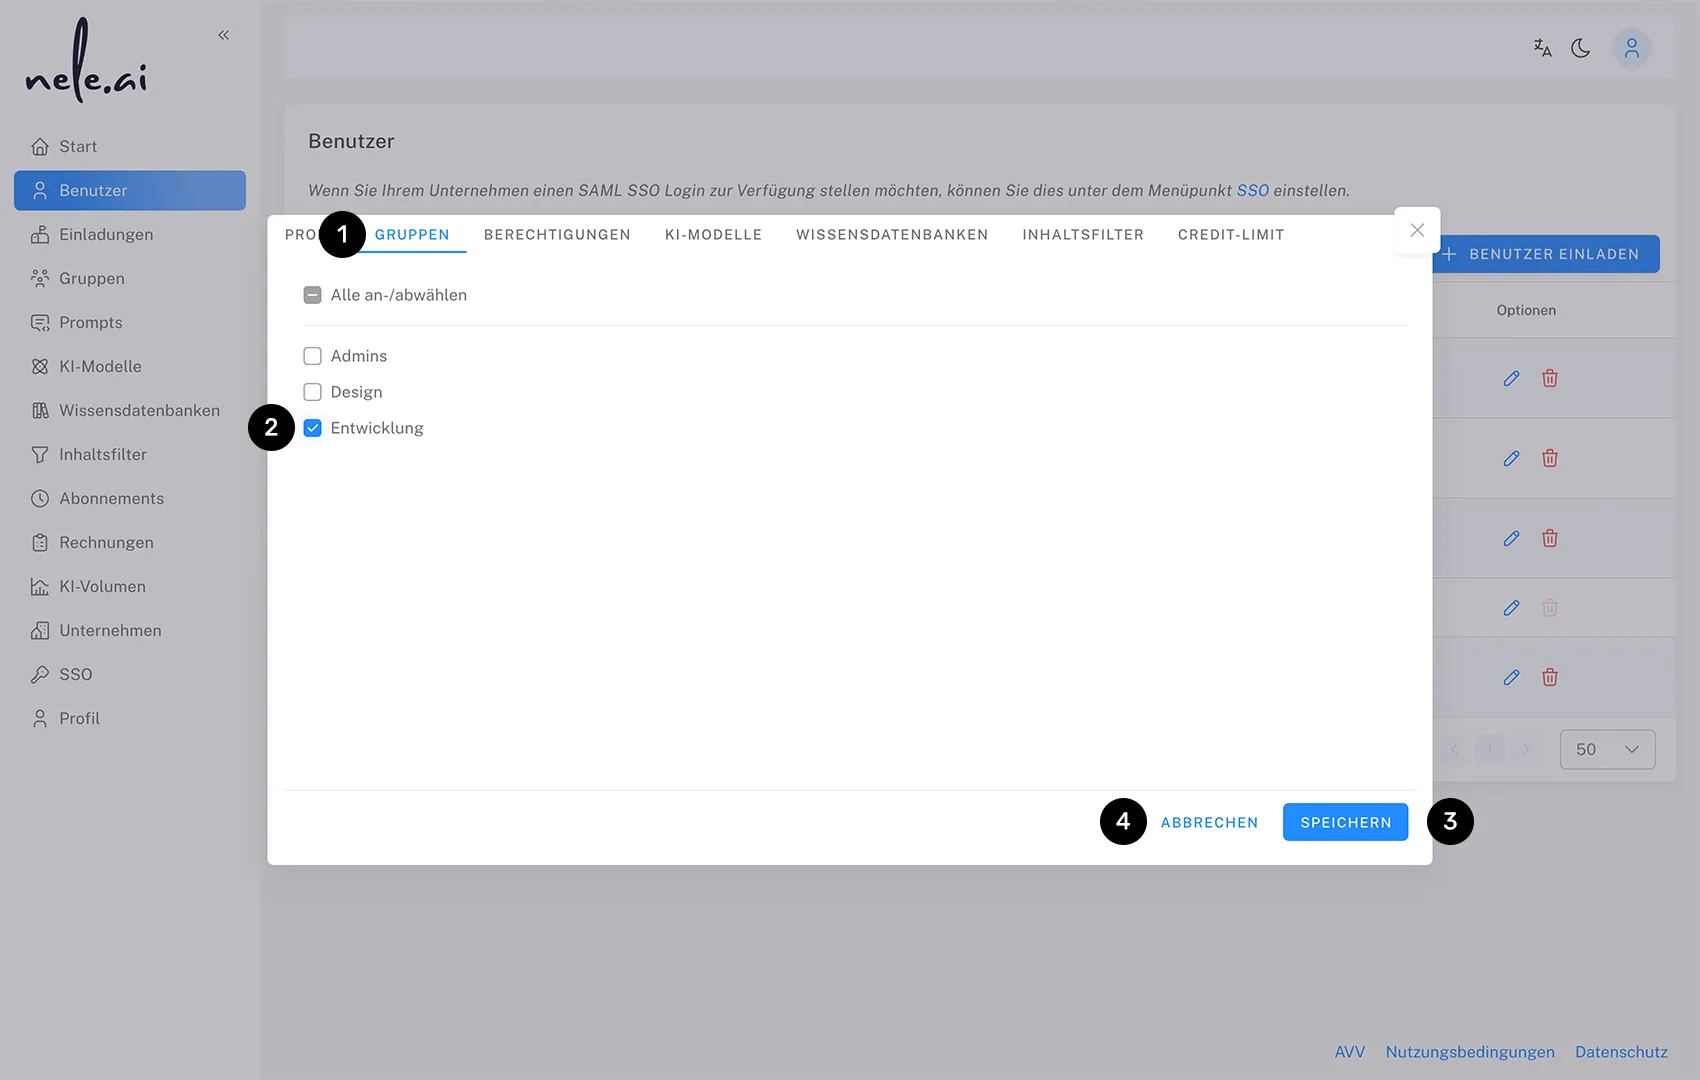
Click the pencil icon on the entry for which you want to assign or remove groups. An overlay opens, in which you then select the “Groups” item in the navigation above (1).
Use a checkbox to the left of the respective entries to select which groups are assigned to the corresponding user (2). In addition to assigning when a user is invited or via SSO, this is currently the only way to add users to a group. Finally, confirm with “Save” (3) or select Cancel (4) to complete the process without saving.
Permission overview
In the user overview, you have a dedicated icon for each user, which you can use to call up a comprehensive overview of all access rights of the respective user and their origin. This overview can also be viewed without active editing rights.
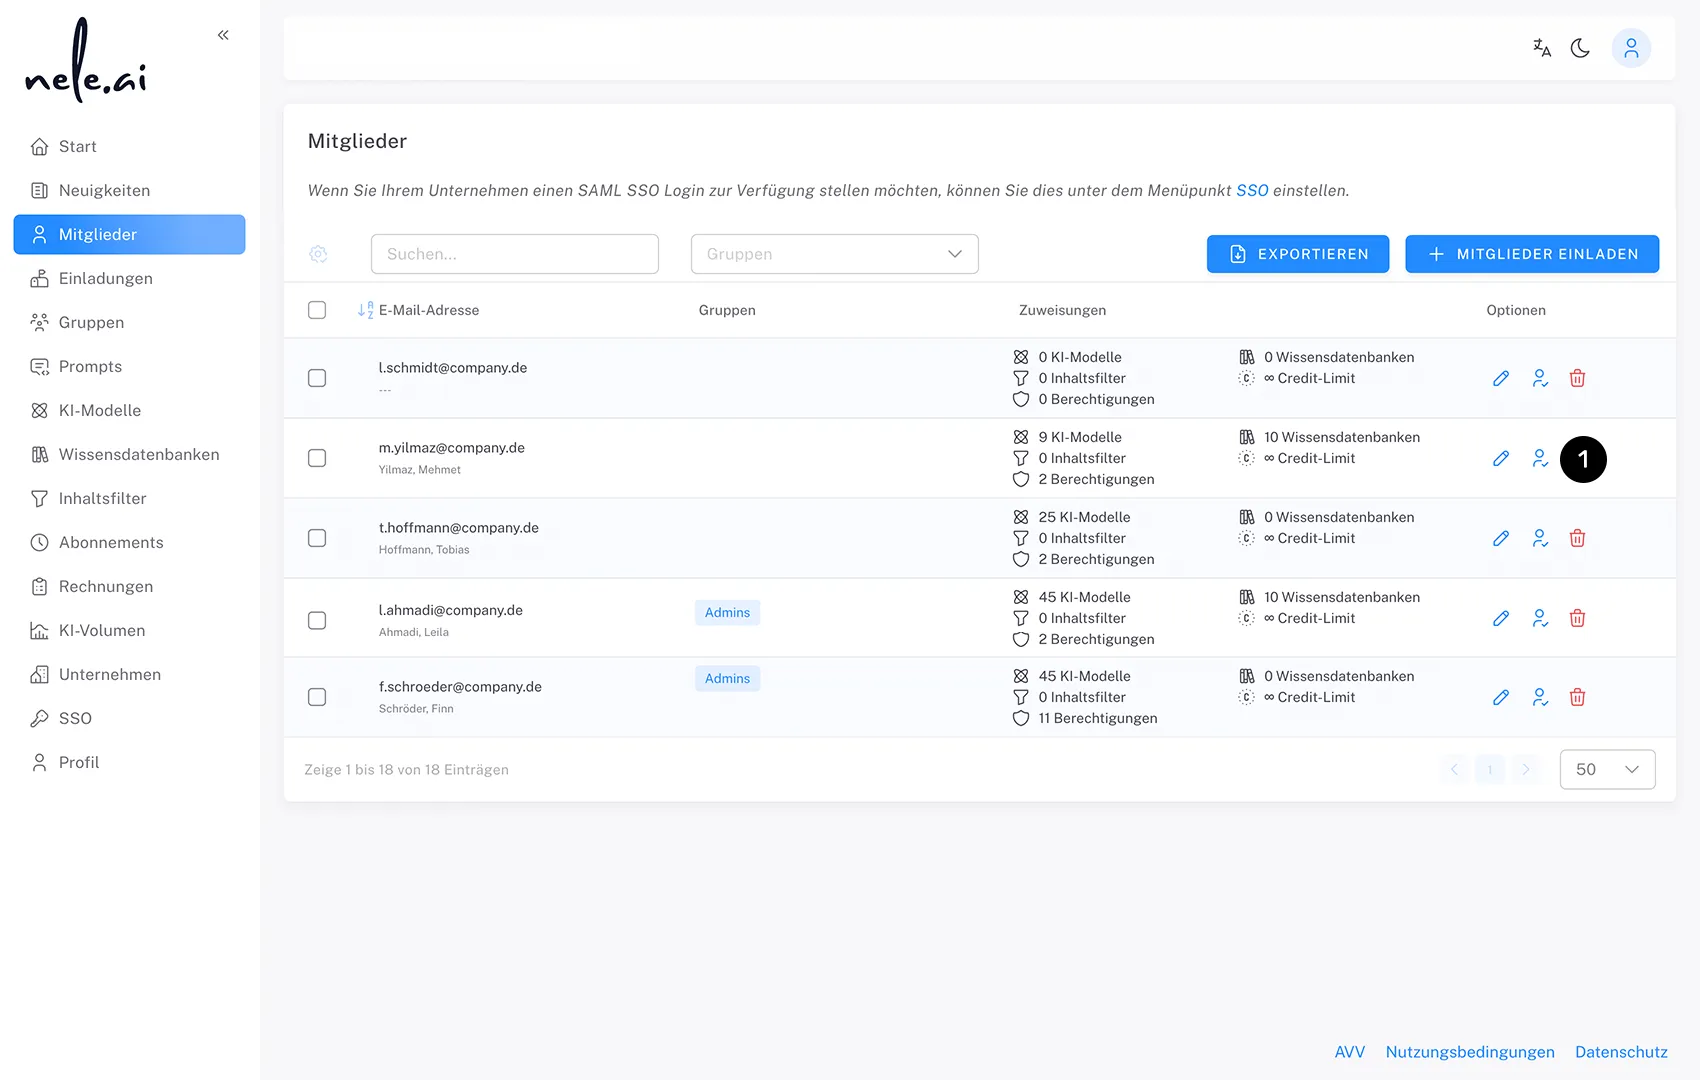
Click on the permission icon in the user overview (1) next to the “Edit” and “Delete” options. A modal opens with several tabs that cover different permission categories (2):
- Permissions: User permissions, admin area permissions, and knowledge base permissions in the admin area
- AI models: access to AI models in the application
- Knowledge bases: Access to knowledge databases in the application
- Content filters: Active content filters
- Credit limit: AI volume limit
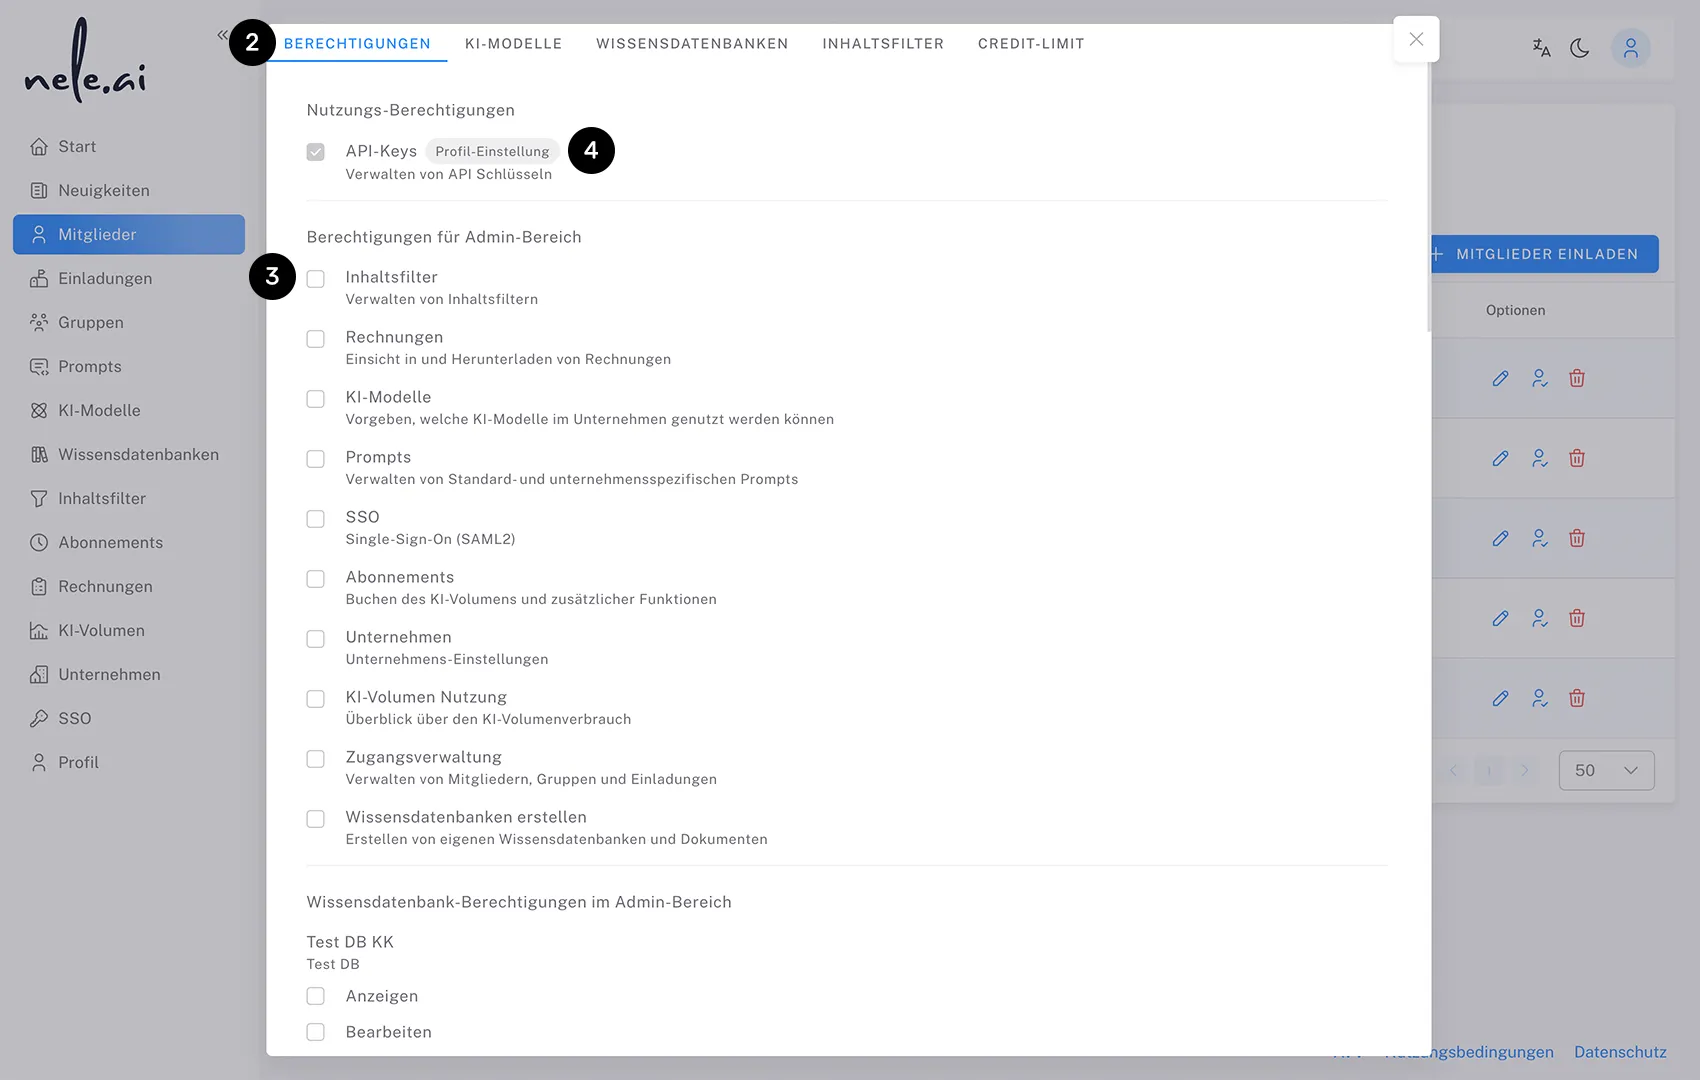
For each entry, a checkbox (3) shows whether the user has the appropriate authorization. If permissions are active, all sources are displayed behind the title (4), which currently grant the user access (e.g. “Group 1", “Group 2" or individual user settings). The presentation of the sources is additive and shows all relevant sources of supply.
Changes to user rights, group rights or group assignments are reflected in real time in the authorization overview.
Special feature of the credit limit:
There is a special logic for the credit limit, which does not always display all sources of supply. Only the sources that actually determine the applicable limit are shown:
- Unlimited limits always take precedence over defined limits
- If there are several equivalent highest limits, all corresponding sources are displayed
- “Undefined” limits are usually hidden and subordinated to defined limits
- Exception: “Undefined” limits are treated as unlimited and are displayed when at least one other source is unlimited
This overview allows you to see at a glance which permissions a user has and where they come from without having to open the individual editing overlays.
Permissions
Here you have the option to assign permissions to the corresponding user. There are three categories of authorization to choose from:
- permission to generate an API key
- assigning authorizations within the admin area
- permissions for knowledge databases.
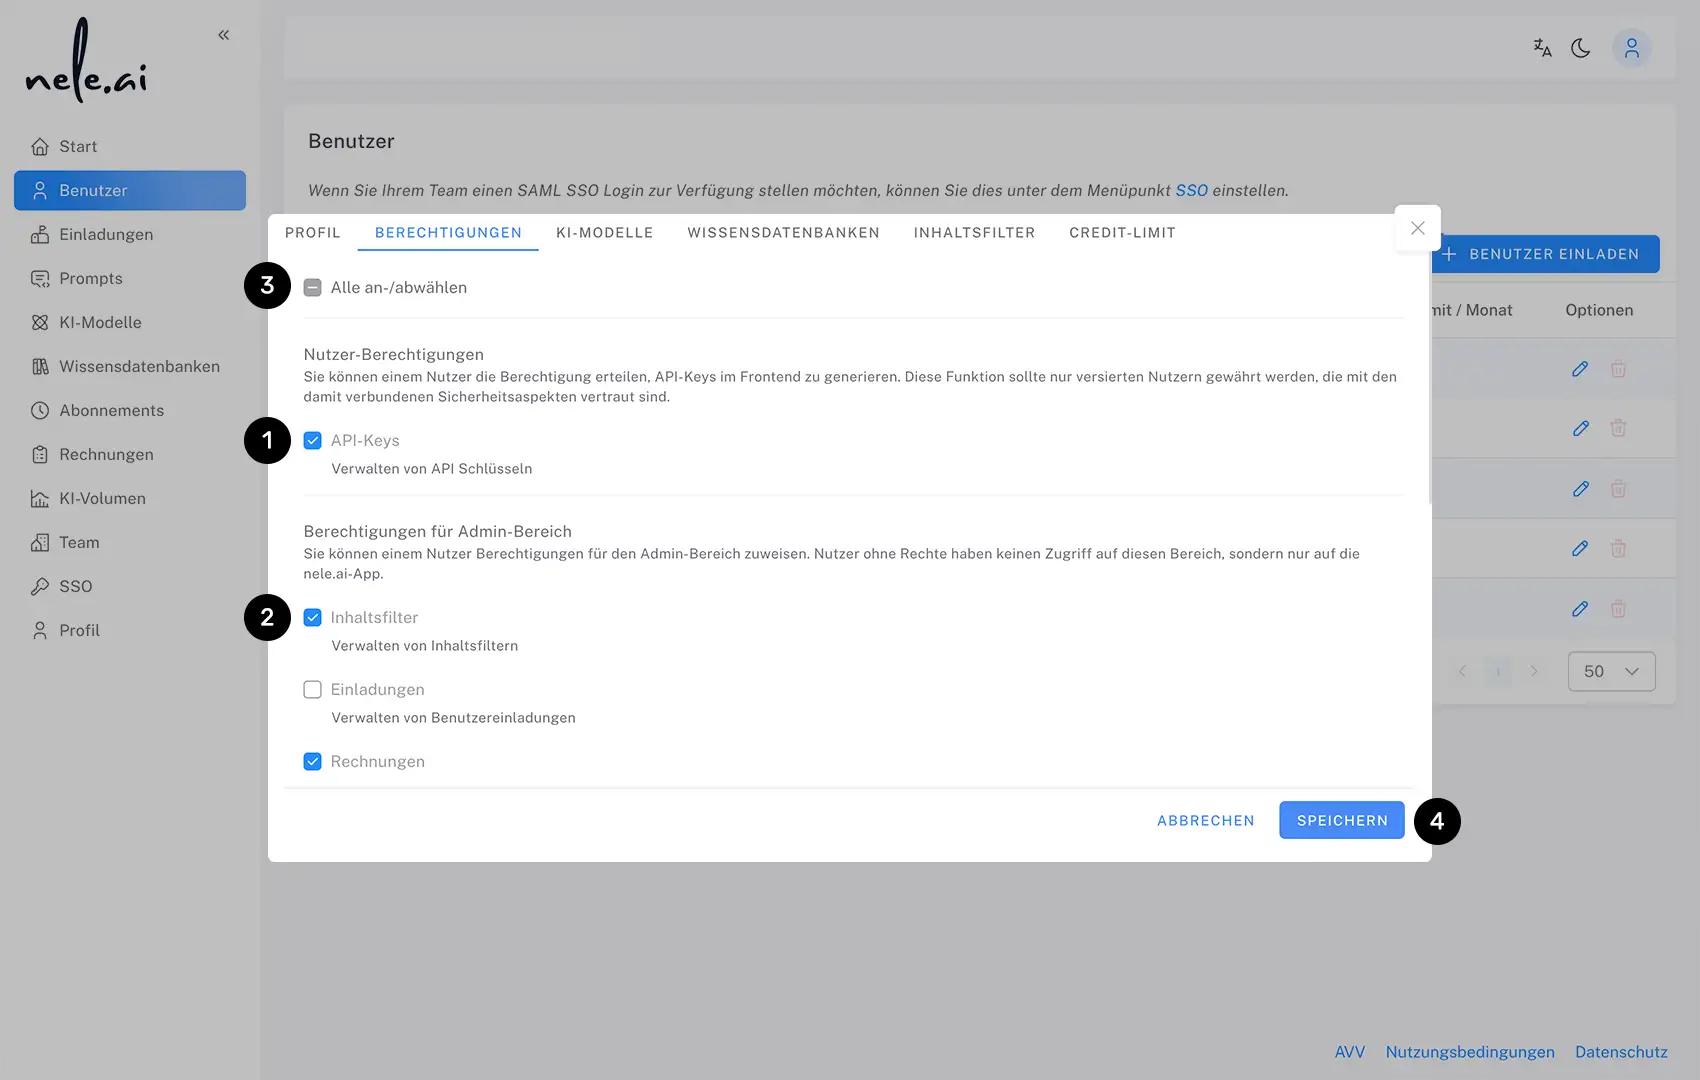
Permission to generate an API key
In the program settings of nele.ai, users have the option to generate an API key. Read more about this in the appropriate manual entry.
Click on the checkbox (1) in the permission settings of the admin area to allow the user to generate a key or prevent this.
Admin area permissions
Click on a checkbox to the left of the respective entries (2)to give the user access to the appropriate area. The unselected areas are not visible to users without rights.
Select “Deselect all” (3)to allow all areas at once or to withdraw permission for all areas at once. This also allows you to adjust the checkboxes in the categories “Authorization to generate an API key” and “Assign permissions to knowledge databases.”
Send your final invitations via the “Send invitations” button (4) or adjust additional settings.
Assigning permissions for knowledge databases
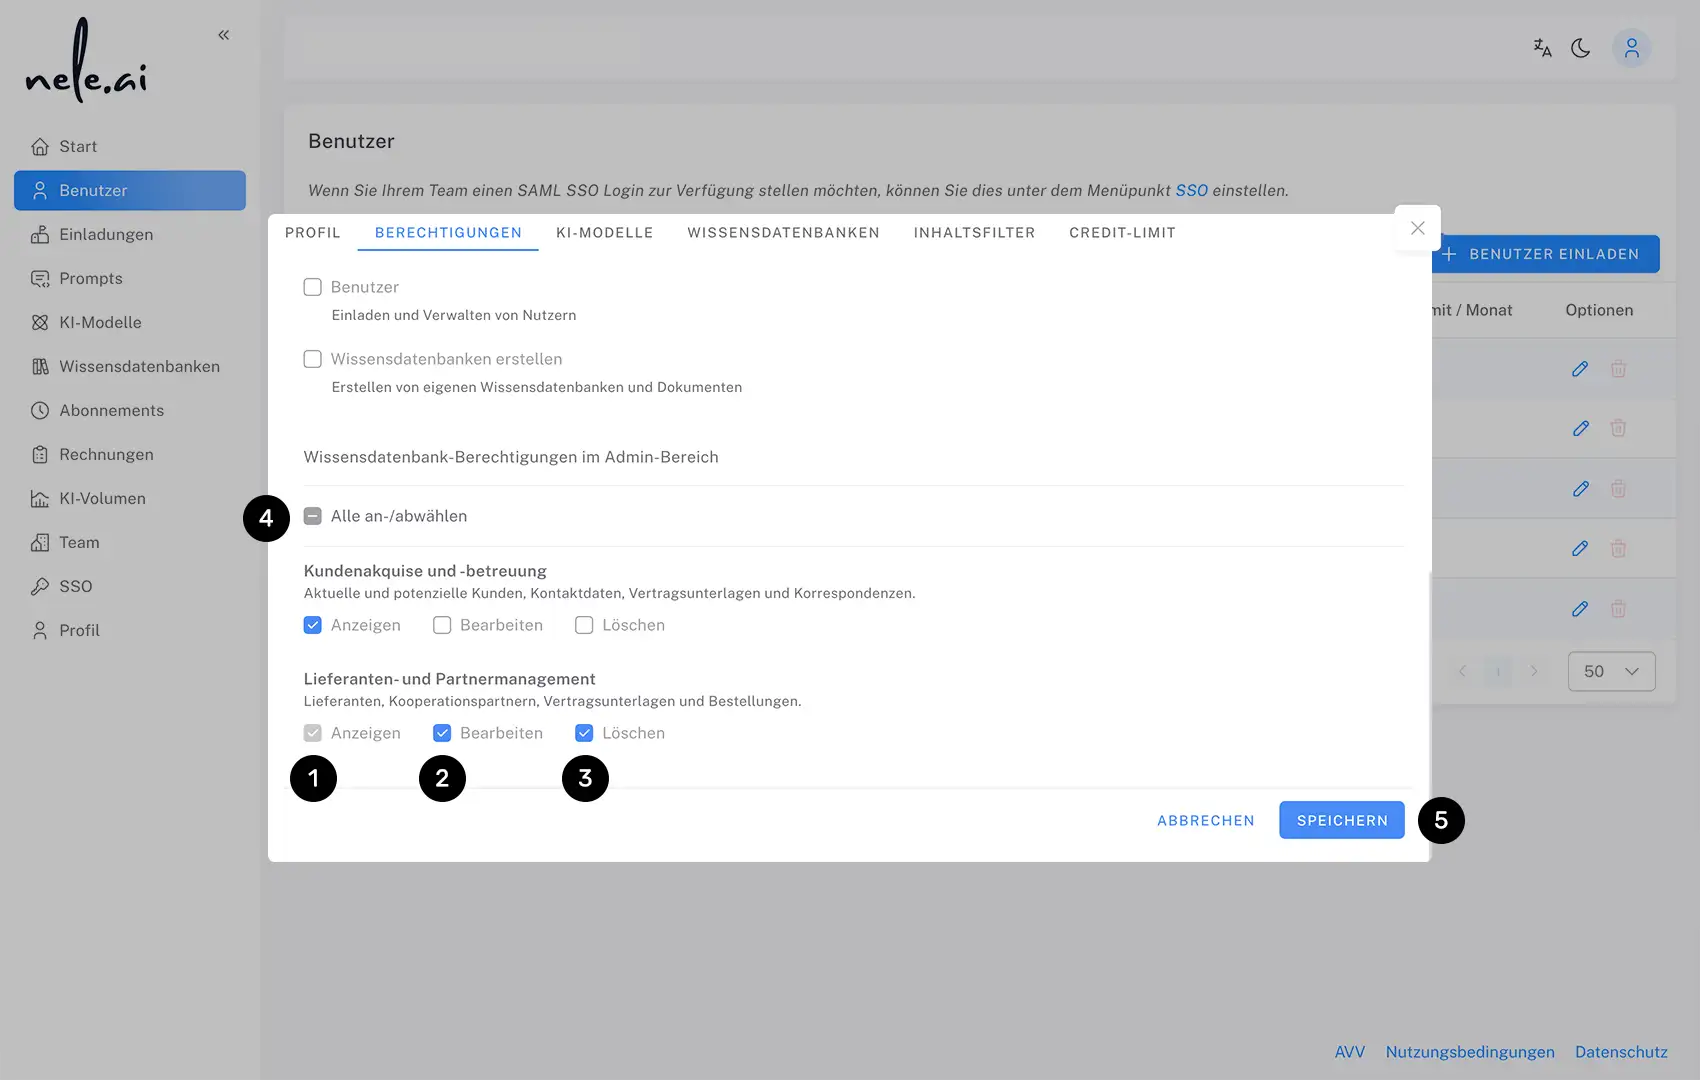
The permission settings for knowledge bases are in the same overlay. To do this, scroll down a bit further. Here you can set what options a user has with regard to viewing and editing specific knowledge databases.
Select “View” (1) for a knowledge database to simply make this knowledge database visible to the user. This is the lowest possible level of authorization.
In addition, a user can edit a knowledge database separately from each other (2) or the deletion of one (3) be conceded.
Select “Deselect all” (4)to allow all areas at once or to withdraw permission for all areas at once.
Finally, confirm your selection with “Save” (5).
Allowed AI models
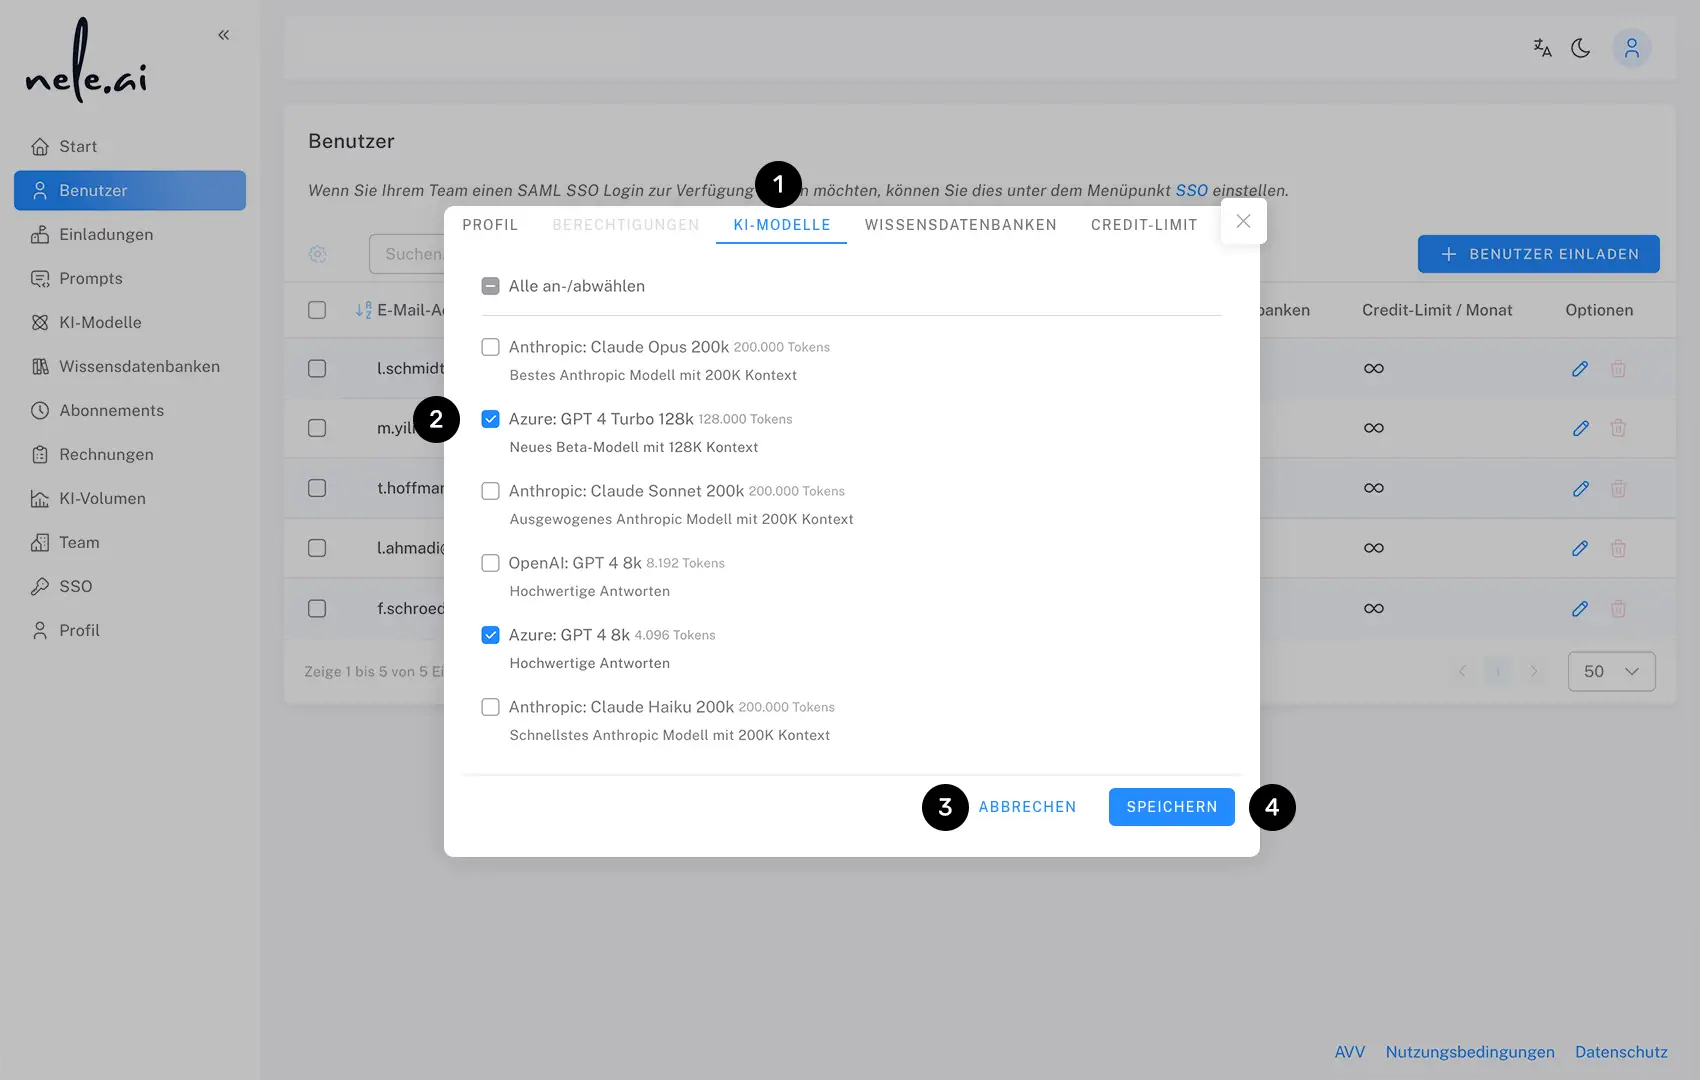
Click on the pencil icon on the respective entry for which you want to adjust the allowed AI models. An overlay opens, in which you then select the item “AI models” in the navigation above (1).
Use a checkbox to the left of the respective entries to select which models are assigned to the corresponding user (2). Finally, confirm with “Save” (3) or select Cancel (4) to complete the process without saving.
Allowed knowledge bases
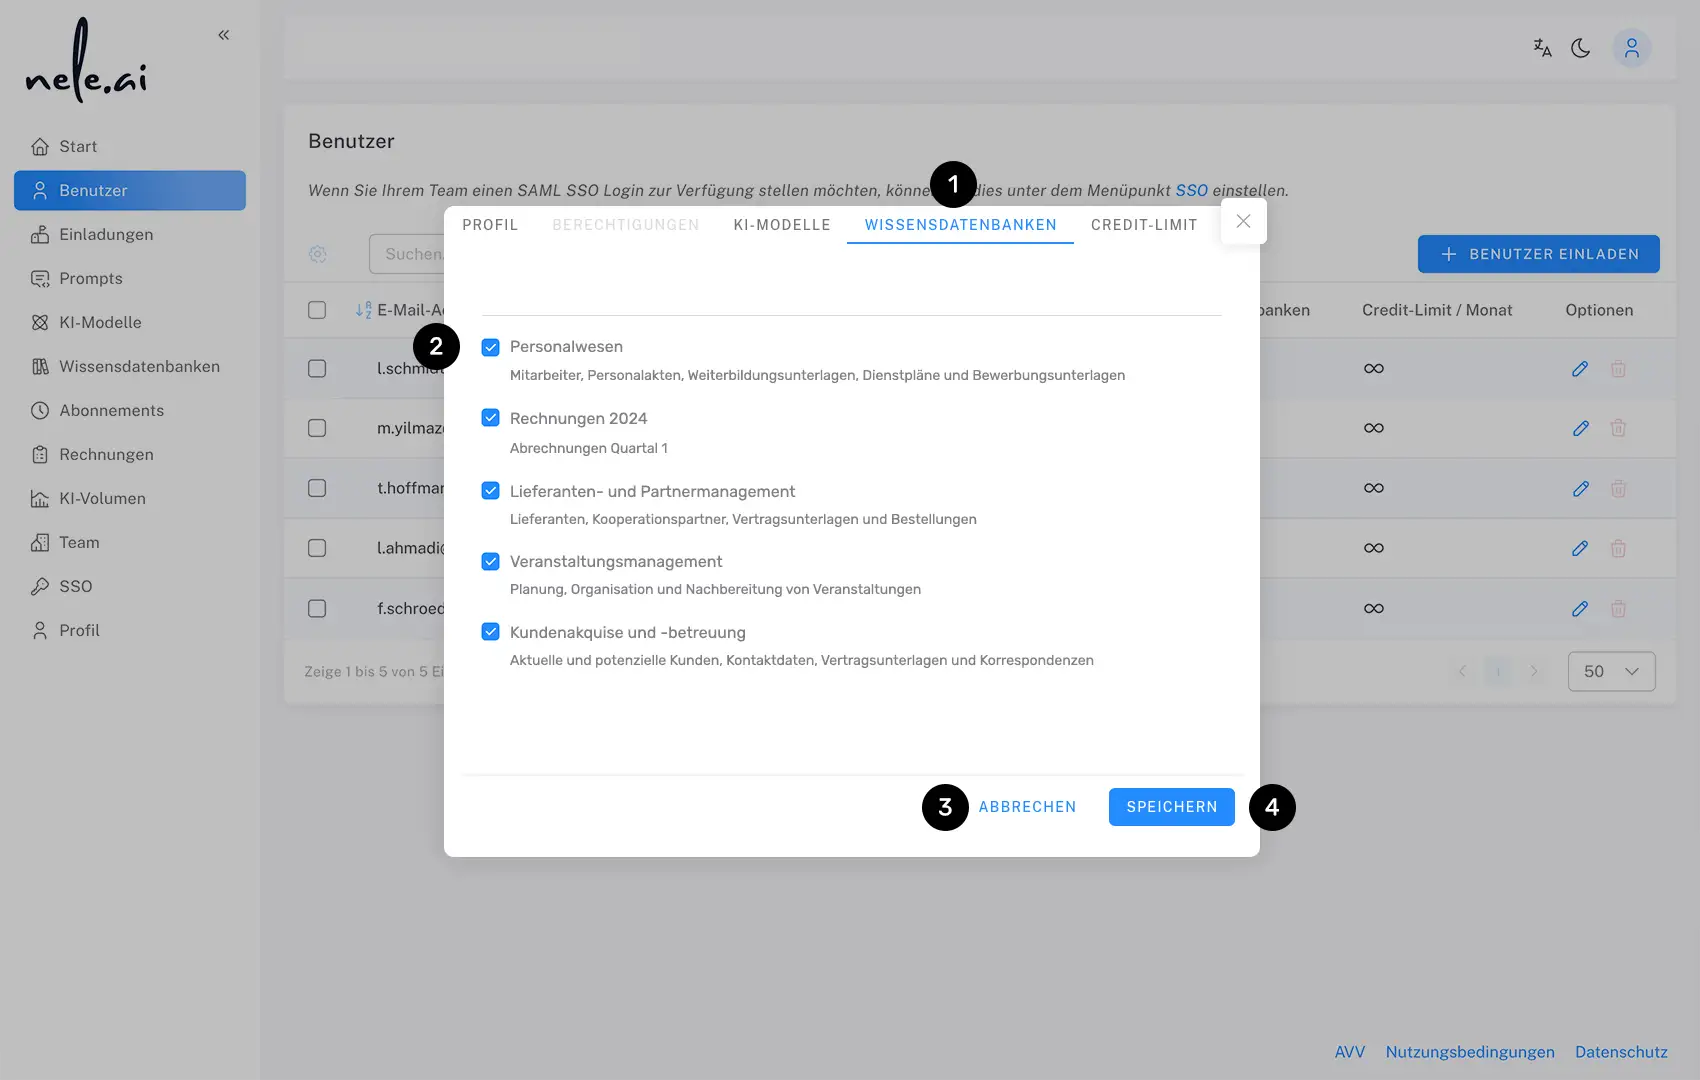
Click on the pencil icon on the respective entry for which you want to adjust the allowed knowledge databases. An overlay opens, in which you then select the “Knowledge Databases” item in the navigation above (1).
Use the checkbox to the left of the respective entries to select which knowledge databases are assigned to the corresponding user (2). Finally, confirm with “Save” (3) or select Cancel (4) to complete the process without saving.
Assigned content filters
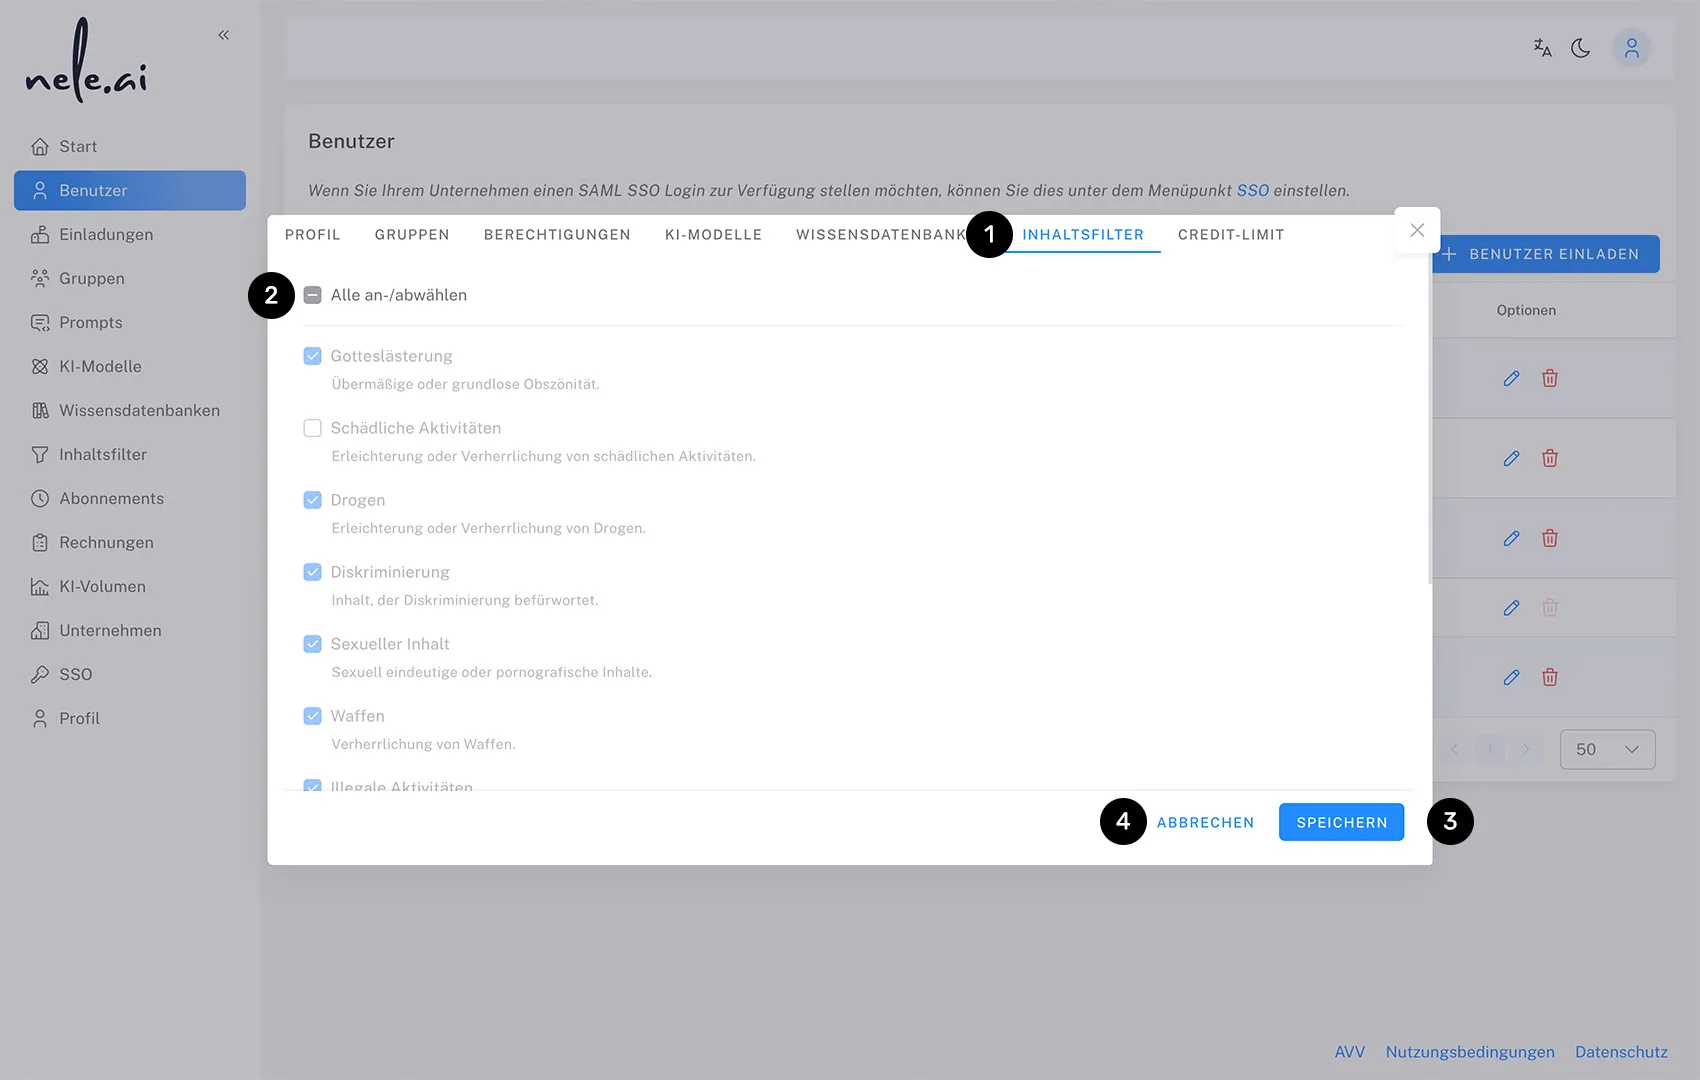
Click on the pencil icon on the entry for which you want to adjust the content filters. An overlay opens, in which you then select the “Content filter” item in the navigation above (1).
Use a checkbox to the left of the respective entries to select which content filters are assigned to the corresponding user (2). These filters specifically block certain categories of requests and ensure safe and appropriate use of AI systems. Finally, confirm with “Save” (3) or select Cancel (4) to complete the process without saving.
Set credit limit
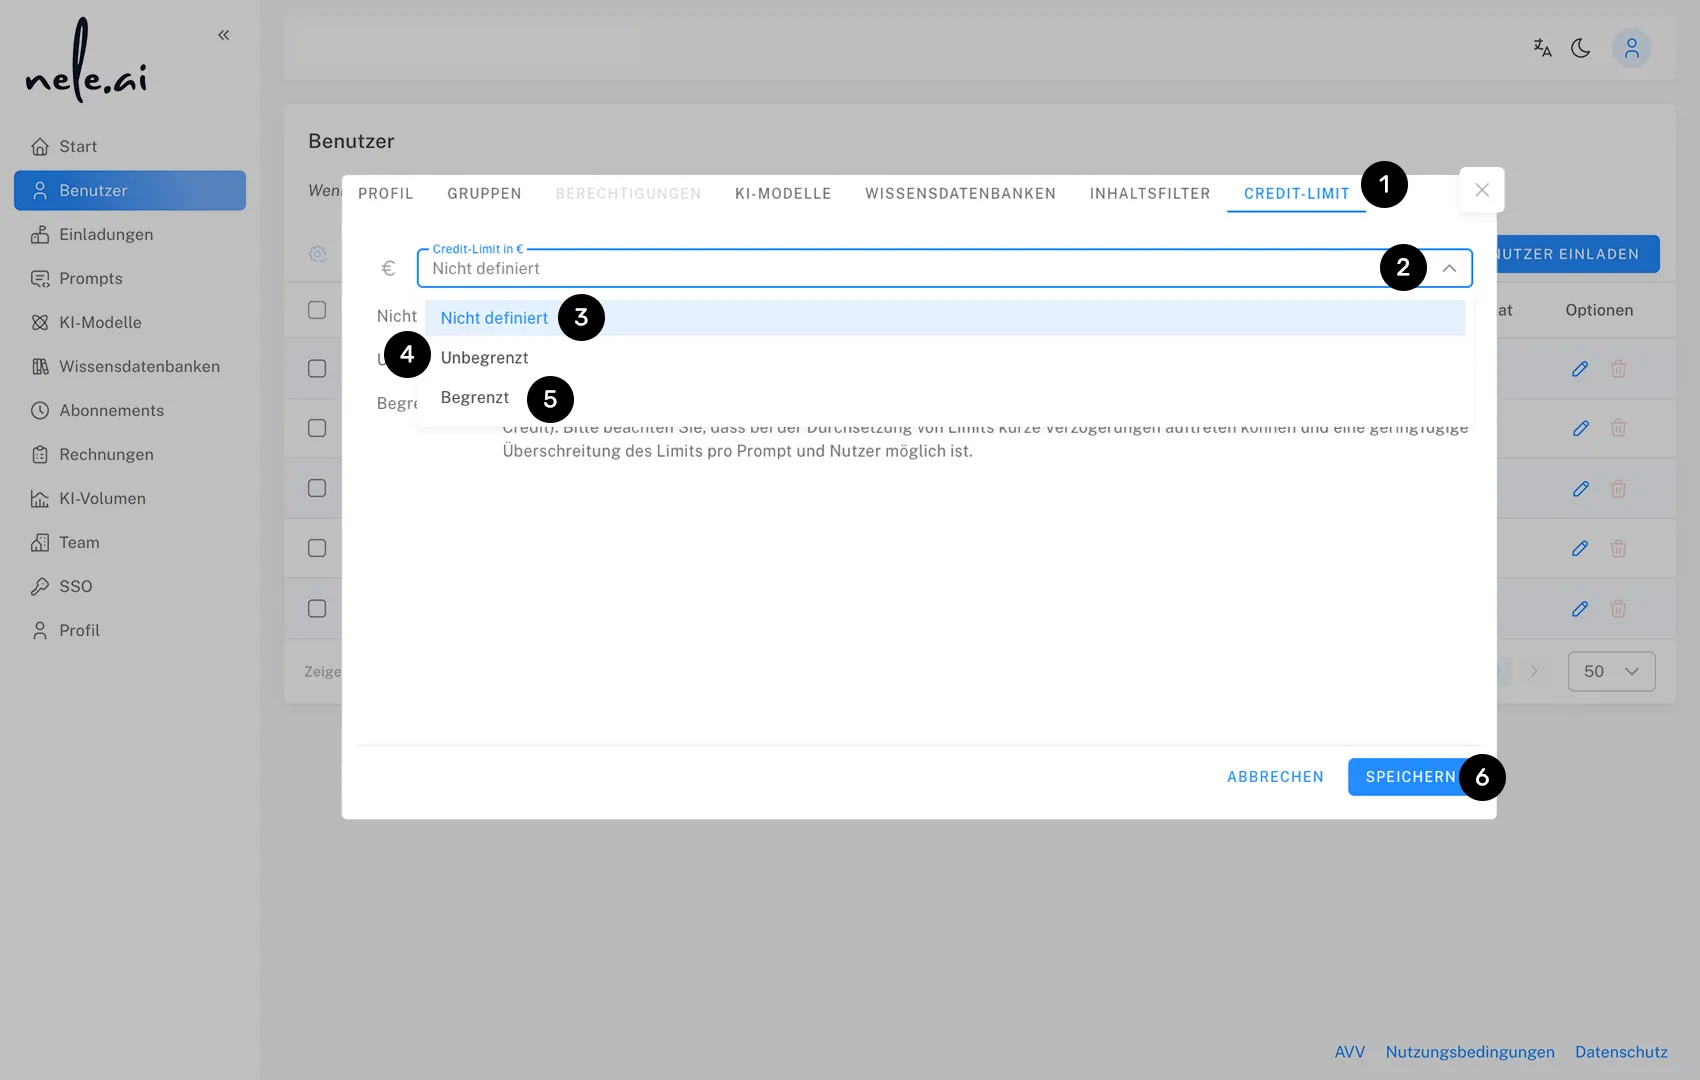
Switch to the “Credit Limit” tab (1) to set a monthly spending limit for the corresponding user.
From the drop-down menu, select (2) one of the following options:
Not defined (3): The user either receives a limit from another group membership or they have no limit if no other group sets a limit. The highest limit of a group counts.
Unlimited (4): The user can use the system without limits.
Limited (5): The user is assigned a fixed monthly limit. Set a limit directly in credits (one credit here is equivalent to around one euro). Please note that there may be short delays in enforcing limits and that the limit may be slightly exceeded per prompt and user.bounded
In the case of a credit limit, a user is always subject to the highest, specifically set limit assigned to a user, individually or from several groups.
Finally, confirm your selection with “Save” (6).
Manage multiple users at the same time
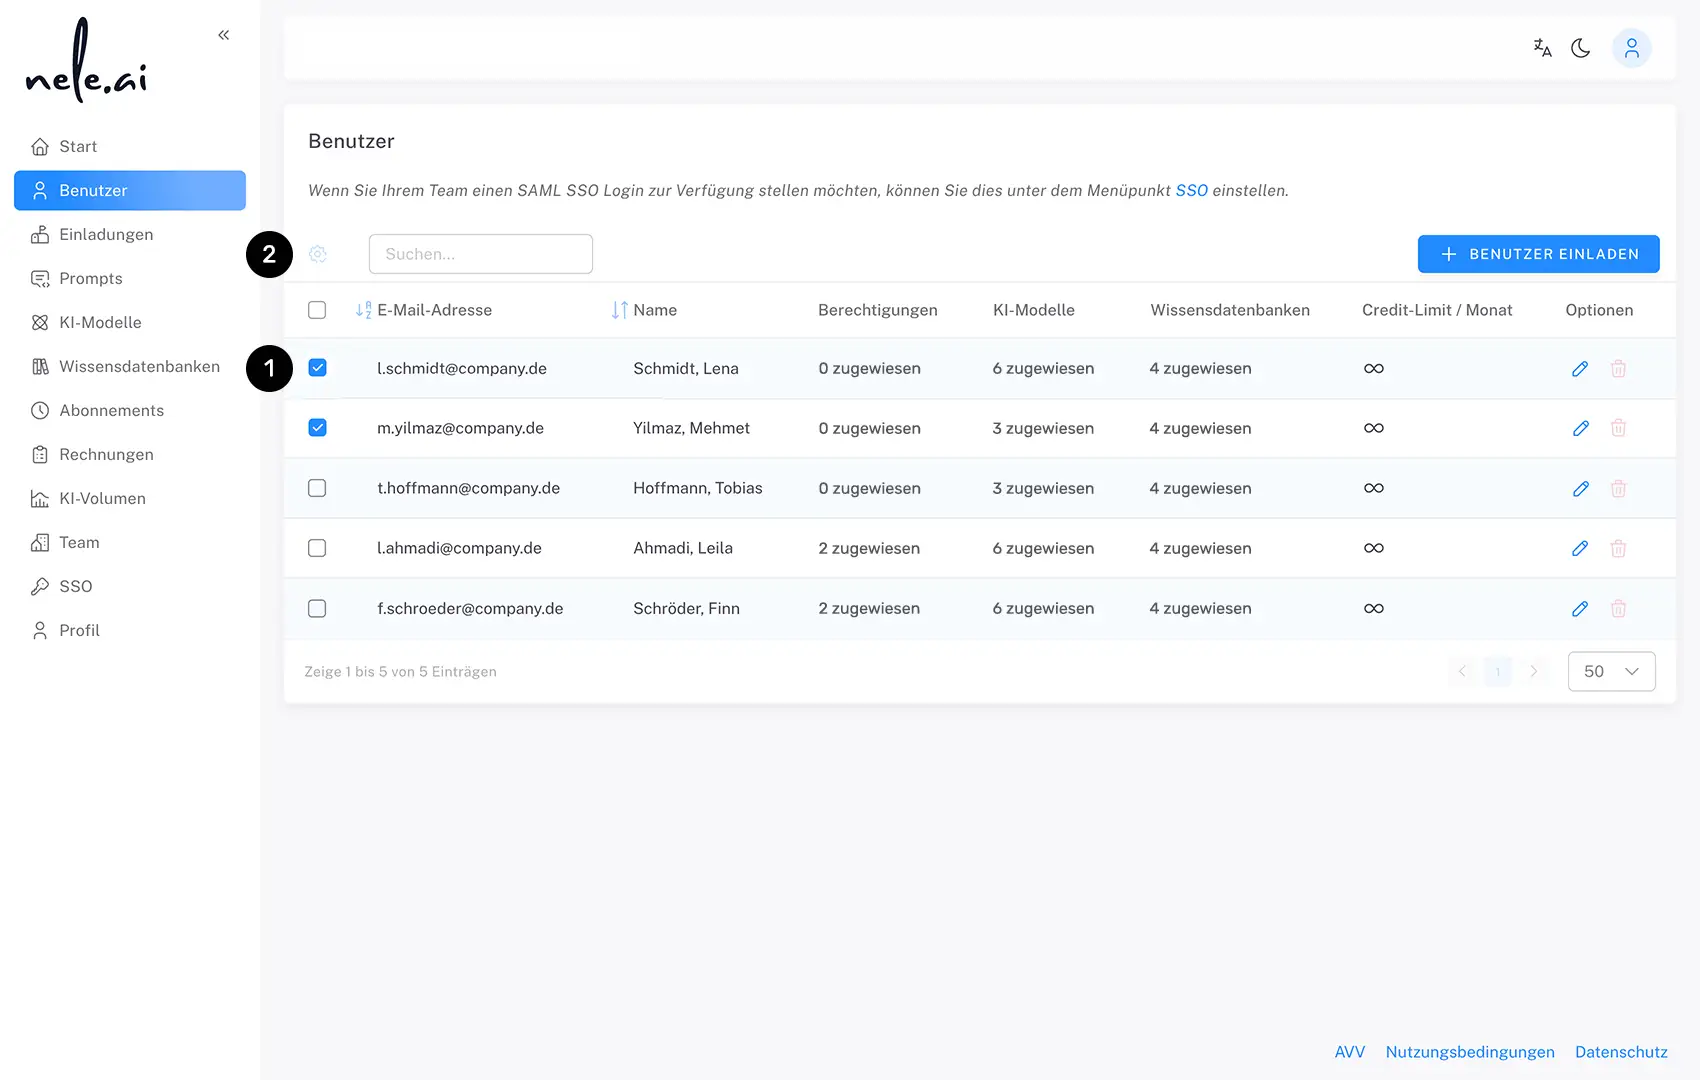
If you want to adjust the same settings for several users at the same time, click on the checkbox to the left of the corresponding columns and make your user selection first (1). Then click on the gear icon (2) and select the desired action you would like to take from the drop-down menu.